Please do a clean Klipper installation. It seems some modifications you have installed may interfere with Klipper, for example right now it seems you have some old or wrong version of c_helpers.so library, which normally is automatically recompiled by Klipper to include any new functionality. However it is not happening in your case. And it is infeasible to debug and find the root cause of issues on a machine with unknown set of untested modifications. If you start with clean Klipper, you can at least make sure that the generic_cartesian work and you’ll get a working configuration (or not, in which case we can maybe find bugs in Klipper and actually fix them). Then if you absolutely need some additional mods, you can install them one by one, testing Klipper at each step. If you see that it breaks at some step, you’ll then have an option to report the compatibility issues to the author of that modification that break Klipper.
Sooo with a small test config from chat gpt it works and also with Cartographer add on and Led effects add on but now i want to setup a config vor idex 6wd and i dont get it how it Works what i need to put where
Is it possible to make a rough config in therms of stepper and carriages
Thanks so far ![]()
Could you please share your current printer.cfg? I am having issues setting up my tridex as well and would like to see what you did to make it work.
I’m getting the following error when starting Klipper:
Option ‘microsteps’ in section ‘dual_carriage v’ must be specified
The strange thing is: I have the microsteps option defined in the [dual_carriage v] section of my config, so this error shouldn’t happen.
I’ve double-checked the spelling and indentation, and everything seems correct. Could this be a parsing issue or a problem with how Klipper loads that section?
Has anyone else experienced this?
printer 6WD_IDEX_TEST.cfg (13.1 KB)
A lot of the config is from you @mandela64
########################################
# X-Carriage
########################################

[carriage x]
endstop_pin: EBBCan0: PB8
position_min: -24
position_endstop: -24
position_max: 263
homing_retract_dist: 5
homing_speed: 50 #100 #Max 100
second_homing_speed: 10
#homing_positive_dir: false

# S5 (T0-Left Back)
[stepper x] #stepper_x
carriages: x-y
step_pin: PG9
dir_pin: PG10
enable_pin: !PG13
microsteps: 64
rotation_distance: 40
full_steps_per_rotation: 200  #set to 400 for 0.9 degree stepper

[tmc5160 stepper x]
cs_pin: PD2
interpolate: false
spi_software_sclk_pin: PC6
spi_software_mosi_pin: PC8
spi_software_miso_pin: PC7
run_current: 1.10 #2amp max
sense_resistor: 0.075
stealthchop_threshold: 999999

########################################
# Dual-Carriage
########################################

[dual_carriage u]
primary_carriage: x
safe_distance: 2
endstop_pin: EBBCan1: PB8
position_min: 40
position_endstop: 328.5 #328.5 T1 +Left/-Right
position_max: 328.5 #328.5
homing_retract_dist: 5
homing_speed: 50 #100 #Max 100
second_homing_speed: 10
#homing_positive_dir: true

# S7 (T1-Right Back)
[stepper u] #dual_carriage
carriages: u+y
step_pin: PB4
dir_pin: PB3
enable_pin: !PB5
microsteps: 64
rotation_distance: 40
full_steps_per_rotation: 200  #set to 400 for 0.9 degree stepper

[tmc5160 stepper u]
cs_pin: PA9
interpolate: false
spi_software_sclk_pin: PC6
spi_software_mosi_pin: PC8
spi_software_miso_pin: PC7
run_current: 1.10 #2amp max
sense_resistor: 0.075
stealthchop_threshold: 999999

########################################
# Y-Carriage
########################################

[carriage y]
endstop_pin: ^PF1
position_min: 0 #40
position_endstop: 354
position_max: 354
homing_retract_dist: 5
homing_speed: 50 #100
second_homing_speed: 10

# S1 (Y-Right)
[stepper y] #stepper_y
carriages: y
step_pin: PC14
dir_pin: !PC13
enable_pin: !PE6
microsteps: 64
rotation_distance: 40
full_steps_per_rotation: 200  #set to 400 for 0.9 degree stepper

[tmc5160 stepper y]
cs_pin: PD6
interpolate: false
spi_software_sclk_pin: PC6
spi_software_mosi_pin: PC8
spi_software_miso_pin: PC7
run_current: 1.3 #2.5amp max
sense_resistor: 0.022
stealthchop_threshold: 999999
## sensorless homing, plug in jumper on M1-DIAG
#diag1_pin: PC15

########################################
# Y1-Carriage
########################################

[extra_carriage y1]
primary_carriage: y
endstop_pin: ^PF0

# S2 (Y-Left)
[stepper y1] #stepper_y1
carriages: y1
step_pin: PE5
dir_pin: PE4
enable_pin: !PE3
microsteps: 64
rotation_distance: 40
full_steps_per_rotation: 200 #set to 400 for 0.9 degree stepper
#endstop_pin: ^PF0

[tmc5160 stepper y1]
cs_pin: PD5
interpolate: false
spi_software_sclk_pin: PC6
spi_software_mosi_pin: PC8
spi_software_miso_pin: PC7
run_current: 1.3 #2.5amp max
sense_resistor: 0.022
stealthchop_threshold: 999999
## sensorless homing, plug in jumper on M2-DIAG
#diag1_pin: PF0

########################################
# Z-Carriage
########################################

[carriage z]
endstop_pin: probe:z_virtual_endstop #^PC15
position_min: -2.5 #3
position_max: 230
homing_retract_dist: 3
homing_speed: 8 #Max 10
second_homing_speed: 3

[gcode_macro PARK_extruder]
gcode:
    SET_DUAL_CARRIAGE CARRIAGE=x
    G90
    G1 X0

[gcode_macro T0]
gcode:
    G90
    SET_DUAL_CARRIAGE CARRIAGE=x
    G1 X0 F6000
    ACTIVATE_EXTRUDER EXTRUDER=extruder

[gcode_macro PARK_extruder1]
gcode:
    SET_DUAL_CARRIAGE CARRIAGE=u
    G90
    G1 X300

[gcode_macro T1]
gcode:
    G90  ; absolute positioning
    SET_DUAL_CARRIAGE CARRIAGE=u
    G1 X300 F6000  ; move U tool into position (optional)
    ACTIVATE_EXTRUDER EXTRUDER=extruder1
This is where I am at now but have issue with dual_carriage homing. Skipping the Awd steppers for now until I get it working. I also have my z-steppers on a separate control board since I ran out of room on my kraken board.
i use the btt max ez with 10 steppers thats good in my case ![]()
can you share your config ? i can mybe use your’s to use 6 motors and then keep going forward
So I decided I would take a shot at this:
New generic_cartesian kinematics
(incl. CoreXYU/CoreXYUV, generic IDEX and AWD)
But a quick backstory:
I happened to have won a Creality Rotary add-on for a new Laser Engraver they were promoting.
But when it came in, I went to take a picture for a shout out to @CrealityA1FalconLaser
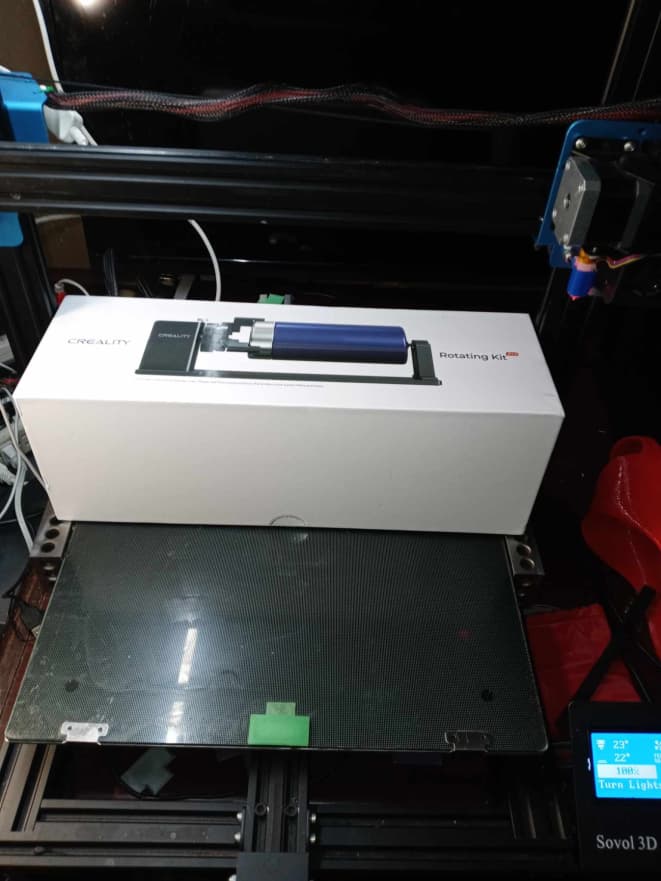
When I snapped this photo, my mind went to another place.., but I put the idea off untill I saw this post; and decided now is good time as any.
After review of the instructions, it seems its just a standard stepper, 1:1 on the chuck. The connection is simply done by unplugging the Y stepper from the engraver, and using thier extension cable to connect it.
So… this project is going on is a Sovol SV03, 350x350x400
It has a Creality 2.2.1 motherboard with 5 drivers, and was intialy setup as X,Y,Z,E0,Z1
I was able to setup the new Rotary at the bed center and chose the biggest cylinder that I could find that it can hold.
My first thought was using the dual Z ports on the board to “syncronize” the Y movements. it worked slightly. But I couldnt control them independantly of course. Reading where mandela64 spoke of running out of steppers…
I happend to have a spare Creality 2.2.1 board, So I moved the Y stepper and endstop along with the Rotary stepper and configured the following
Primary mcu		    Secondary mcu
-------------		------------
X,Z, ,E0,Z1		    Y,Y1,,,
Primary mcu
[mcu]
serial: /dev/serial/by-id/usb-FTDI_FT232R_USB_UART_AB0M9X6L-if00-port0
restart_method: command

[printer]
kinematics: generic_cartesian #cartesian
max_velocity: 300
max_accel: 3000
max_z_velocity: 40
max_z_accel: 200

[safe_z_home]
home_xy_position: 208.5, 184.5  # incl. probe offsets at nozzle position 175x, 175y
speed: 50.0
z_hop: 20
z_hop_speed: 5
move_to_previous: False

[carriage x]
endstop_pin: ^PE5
position_endstop: 0
position_max: 400
homing_speed: 50
homing_retract_dist: 5.0
homing_retract_speed: 5
second_homing_speed: 3

[stepper my_stepper_x]
carriages: x
step_pin: PF0
dir_pin: PF1
enable_pin: !PD7
microsteps: 16
rotation_distance: 40

[carriage z]
endstop_pin: probe:z_virtual_endstop
position_max: 450
position_min: -4
homing_speed: 10
second_homing_speed: 3

[stepper my_stepper_z]
carriages: Z
step_pin: PL3
dir_pin: !PL1
enable_pin: !PK0
microsteps: 16
rotation_distance: 8

[stepper my_stepper_z1]
carriages: Z
step_pin: PC1
dir_pin: !PC3
enable_pin: !PC7
microsteps: 16
rotation_distance: 8
Secondary
[mcu my_y_221]
serial: /dev/serial/by-id/usb-FTDI_FT232R_USB_UART_AG0KDXWR-if00-port0
restart_method: command

[carriage y]
endstop_pin: my_y_221:PJ1
position_endstop: 0
position_min: 0
position_max: 360
homing_speed: 50
homing_retract_dist: 5.0
homing_retract_speed: 5
second_homing_speed: 3

[dual_carriage y1]
primary_carriage: y
endstop_pin: !my_y_221:PE5
position_endstop: 0
position_min: 0
position_max: 360
homing_speed: 50
homing_retract_dist: 5.0
homing_retract_speed: 5
second_homing_speed: 3

[stepper my_stepper_y]
carriages: y
step_pin: my_y_221:PF0
dir_pin: my_y_221:PF1
enable_pin: !my_y_221:PD7
microsteps: 16
rotation_distance: 40

[stepper my_stepper_y1]
carriages: y1
step_pin: my_y_221:PF6
dir_pin: my_y_221:PF7
enable_pin: !my_y_221:PF2
microsteps: 16
rotation_distance: 360
The key is the Rotation distance for the Rotary. It needs to match the size cylinder’s circumference. The piece I’m using for protyping is not the best.
but the vase is ~360mm in Circumference" which coincidentially matches the size of bed it now rests on. So I set the rotation distiance to 360.
To utilize the dual carrige, I first start with the Z gantry already raised above the rotary and issue a home X and Y. Y1 then also homes after Y is done (although I’d prefer it not to need an endstop at all.)
But for now I’m manually triggering the endstop for Y1 (I will model an endstop mount in the near future.) I then issue the command
SET_DUAL_CARRIAGE CARRIAGE=1 AXIS=Y MODE=COPY this syncronizes the Rotary to the Bed and moves the Rotary to under the probe.
Homing Z then with [safe_home] placing the Z probe at the center of the Cylinder.

Once homing is complete. I set the Rotary carrige (y1) to primary. SET_DUAL_CARRIAGE CARRIAGE=1 AXIS=Y MODE=PRIMARY
This locks down the bed and sets the Rotary active for all Y motion.
I then run a z_tilt_adjust, this probes both ends which levels the gantry to the Cylinder (This removes the minor taper from end to end)
once complete, I run a new home z as always. and then of course run the mesh.

Once the mesh is done, I issue the command again to set the rotary to copy mode.
Then manually move the Bed/Rotary so the nozzle is over the cylinder.

one last command to set the rotary back as primary. and is now ready for printing… well soon anyways…
My first goal is a cylindrical Hueforge as they are only a few mm thick…
As the Z layers increases, the Y movements will be more and more effected by circumfrence vs linear distance vs flow rates
Others will have to wait on some much needed non-linear slicer-ing I imagine

But I wanted to share my progress, and give a big thank you to developers for work done on the new generic_cartesian kinematics. its been fun.
YT Short of a bed meshing run…

Thanks all!
One thing I havent yet figured out is how M84 (set_stepper_enable) no longer wants to disable the steppers at idle in this configuration…
Quick update, I hadnt realized that the Dual Carriage config allows the 2nd stepper and endstop to be on its own mcu. I was able to put the Y stepper and endstop, back to primary mcu config. And now to add or remove the Rotary Y is just add or commenting out the include for the now designated Rotary mcu. That greatly simplifies the changes necessary to switch it out.
edit: just one last post as an update and I’ll quit hijacking this thread ![]()
It’s working!! I printed a 100mm(circ) cylinder first on the normal bed. And then mounted it on the Rotary and printed a 60x70x2mm flattened cube as a test.

3 posts were split to a new topic: Shared TMC UART configuration
I usually dont like AI, but in this case gemini was helpful tracking this down.
Summary: Debugging Klipper M84 Macro & SET_STEPPER_ENABLE Error
The Original Problem:
I was receiving SET_STEPPER_ENABLE: Invalid stepper "stepper_x" errors when trying to a custom M84 macro, even though I thought I used the exact names defined in the configuration file (e.g., [stepper stepper_x]).
Symptoms & Diagnostic Steps:
-
Standard names failed: Simple axis names (
X,Y,Z,E) and configuration names (stepper_x) all initially failed or produced errors. -
dump_variablesrevealed the truth: A customdump_variablesmacro revealed the actual internal names Klipper was using:
printer['motion_report'].steppers = ['extruder', 'stepper stepper_x', 'stepper stepper_y', 'stepper stepper_z', 'stepper stepper_z1']
The Underlying Issue:
The issue was caused by a highly customized configuration for a 5th-axis/dual-Y gantry setup. The configuration defined steppers with non-standard section names (e.g., [stepper stepper_x]). Klipper’s internal object model used these exact section names—including the word “stepper” and the space—as the literal internal name for the object: 'stepper stepper_x'.
The SET_STEPPER_ENABLE command requires this exact internal name.
The Solution:
The M84 macro was updated to use the full, internal names, quoted because they contain a space:
gcode
# Example of the final working call in the macro
SET_STEPPER_ENABLE STEPPER='stepper stepper_x' enable=0
Attempts to rename the config sections to standard [stepper_x] resulted in a “Printer is halted” error (Carriage(s) x, y must be referenced by some stepper(s)), confirming that the unusual naming convention was necessary for this specific generic_cartesian kinematics setup.
4 posts were split to a new topic: Question on new generic_cartesion kinematics