Impossible Bed mesh leveling - Cr10sPro V2

Hello All,

I finally received the longer dual-z belt I needed to test out my theory regarding the right side of the x gantry not moving symmetrically with the left. After the install, adjusting my z-offset, verifying the x-gantry was level, and running a new bed mesh my bed level issues went away. For my situation, the issue was mechanical and not firmware/klipper. I’m happy to help others with troubleshooting their bed leveling issues. Thanks for the support in general for this topic.

Regards,
Mac

Hi All, im having the same issue and have been playing with it all for weeks. Ive done 3 calibrations this morning all at the same temp.
this is a wham bam pei sheet


the next is a mirror

And this on some Borosilicate glass bought from a 3d printer supplier

I cant get a good first layer even if i spend the time getting the bed SUPPOSEDLY even and ive managed to get it to +/- 0.08 at best.
now a bltouch should be able to cope with that kind of variance, shouldn’t it?

the touch has and accuracy 0f 0.023 which is in tolerance if only just.
im checking the z gantry and levelling between prints and so there may be issues there but as long as the steppers arnt disabled between adjustment and printing that should not be an issue, should it?

i suspect the probe for my particular issue and would like to do a manual bed mesh but im not sure how to do this with a bltouch installed, it my only z stop, so i cant remove it

  • think its this command but am uncertain how to formulate (last 2 values) or if it will work at all

BED_MESH_CALIBRATE PROFILE= METHOD=[manual | automatic] [<probe_parameter>=] [<mesh_parameter>=]

This is as far as ive got.

BED_MESH_CALIBRATE PROFILE= METHOD=[manual] [<probe_parameter>=<value?>] [<mesh_parameter>=<value?>]

im using and skr 1.4t with 2209 drivers and antlclab touch.

happy to try any testing for devs.

TIA.

I have now sorted the manual calibration thanks, i just omited the last 2 params, would be nice to know what the do though.

Print after manual mesh MUCH better so im going with the dodgy probe theory. Im certain that i have mechanical problems as well, but one issue at a time eh?

Just want to chime in that I have the exact same issue.

No matter what I try, the printer always squishes the filament on the left side of the bed, and is almost coming lose on the right side of the bed.

I tried:

  • with bed mesh
  • without bed mesh (I deleted the bed mesh)
  • screw tilt
  • with z-tilt
  • without z-tilt
  • with genuine bltouch
  • with genuine prusa super pinda
  • using the z-endstops of the printer for z home
  • using the probe for z home
  • with anti-backlash nuts
  • without anti-backlash nuts

I’m running an Anycubic Mega X (30cmx30cm bed).
I run TMC2208 on an SKR 1.3 board (had the same issue with the original TriGorilla board).

I let the bed sit at 60C for some 10 mins before I start the bed mesh calculation. Just to make sure that the bed is at temperature and no longer ‘moving’

I’ve talked on reddit and facebook about this issue, tried all the solutions people give me, but all seems to point that the bed mesh is not used.

I’m now thinking of just giving up on the automatic bed leveling…

1 Like

Exactly the same issue here. With Marlin and octoprint, my glassbed was almost completely flat.
Now, with Klipper, my bed looks completely warped, no matter what I try. It is a rather large Bed (310x310) on a CR10 V2 with a SKR Pico Mainboard. Klipper seems to cause these problems, because with Marlin and UBL, everything worked fine.
Maybe it is not Klipper NOT applying the corrections, but Klipper applying corrections that are not needed!

removed confusing post

The screenshots appear to show Klipper moving in the correct direction. If the right side is 0.15mm higher than the left, then the Z axis needs to move up from 6 to 6.15 to maintain the same distance between the nozzle and the bed. Also note that a Z change that small is hard to see when moving the gantry. It’s about 6 degrees of total rotation on an 8mm pitch lead screw spread out over a several second span as the gantry is moving.

You are absolutely right. If a compensation would happen and the UI shows the position realtive to home it would be the correct direction.

I removed my previous post as I got confused with how the UI shows the current position.
For me the mesh error especially happens on the x-axis and after starring at my printer for ten minutes I might have an idea about what is going on and it might be a mechanical error afterall.

Even if this might be slightly offtopic I write down my findings here to help others with similar problems.

In my case checking the probe z-offset at different prositions lead to the conclusion that my whole x gantry has a torsion along the x axis. Combined with the probe’s y-offset this moves the nozzle closer to the bed while the probe moves further away when increasing the x position. In other words, the whole print head rotates during x-axis movements.

I will try to fix it mechanically but I think this could also easily be fixed with a probe parameter.
By having two z-offsets, measured close to x-min and x-max the z-offset of any position could be calculated, given the torsion is linear.

I found a possible solution worth trying:
As Klipper seems to ignore the default bed mesh, put a G29 scribt in your config:

[gcode_macro G29]
gcode:
G28
BED_MESH_CLEAR
BED_MESH_CALIBRATE
BED_MESH_PROFILE SAVE=CR10 #your printers name
SAVE_CONFIG

Then, load this profile in your start code:

like this:

[gcode_macro START_PRINT]
default_parameter_bed_temp = 60
default_parameter_extruder_temp = 180
gcode =
M104 S{180}
M190 S{60}
M140 S{BED_TEMP}
M104 S{EXTRUDER_TEMP}
G90
G28
BED_MESH_PROFILE LOAD=CR10 # your printers name
M109 S{EXTRUDER_TEMP}
G92 E0
G1 X0 Y0 F2000
G1 Z0.15 F300
G1 X60.0 E10 F600
G1 X100 Z0.1 E12.5 F1000
G92 E0
G1 X150 F5000

In your End code,
use
BED_MESH_CLEAR

It seems to work for me, but I still need to do some tests.

Hello everyone.
Same thing here. Tested on :

  • Ender 3.
  • Ender 6.
  • Ender 5 modified with MGN12.

All with genuine ANTACLAB BL-TOUCH SMART V3.1.

All these printers have a perfect mesh with Marlin 2.0.7.2 to 2.0.9.3. But not with Klipper.

I print centered on the bed a rectangle of 80 mm side. The filling of the first layer is done from the lower right corner to the upper left corner. The more one advances towards the upper left corner, the more the layer is crushed with the perfect crushing exactly in the central zone of the bed. (At the place where safe homing is carried out)

This corresponds globally to the profile measured by the bl-touch.

For example :

Probed points of ender 6 :
// Mesh Leveling Probed Z positions:
// 0.003958 -0.014375 -0.029375 -0.006458 -0.010417
// 0.018125 0.007292 -0.004583 0.007708 -0.004792
// 0.027083 0.003542 -0.008125 0.012708 0.008542
// 0.037708 0.017917 0.012500 0.024375 0.014167
// 0.024375 0.013333 0.007917 0.028958 0.023333

Probed points of ender 3:
// Mesh Leveling Probed Z positions:
// 0.000208 -0.016042 -0.013333 0.003958 -0.008333 0.007708 -0.006042
// -0.014792 -0.017500 -0.015625 0.005000 -0.003333 0.005625 -0.023333
// -0.006667 -0.010417 -0.011667 0.015833 0.014167 0.036875 0.011875
// -0.014792 0.006667 -0.002708 0.017708 0.021875 0.042917 0.014583
// -0.004583 -0.000625 0.001667 0.019583 0.022917 0.053125 0.048333
// -0.026042 -0.016458 -0.016042 0.001250 0.005000 0.033542 0.066250
// -0.060833 -0.067292 -0.070417 -0.057500 -0.055000 -0.029583 -0.035625

I completely disassembled the machines and reassembled them on a marble with a mechanic’s square and replaced the profile of the X axis of the ender 3 to have one as straight as possible and the fault does not move at all. At the sight of the regularity of the regularity of the defect I began to think of an algorithmic problem. Being a developer by profession, I looked at the klipper mesh code but I must say that everything seems extremely coherent… It’s really very curious…
It does look like a mechanical problem, but on the other hand, even older versions of Marlin don’t have the problem. But klipper’s code looks correct.

Note that in version 2.0.9.3 Marlin includes a X axis twist correction function.

1 Like

Same issue here. Not a lot to add: every solution that was mentioned before doesn’t work. The motion system is fine, it’s not a mechanical issue. For those interested:

[bed_mesh]
speed: 80
horizontal_move_z: 5
mesh_min: 20, 20
mesh_max: 190, 195
probe_count: 5, 5
mesh_pps: 2, 2
algorithm: bicubic
bicubic_tension: 0.2
move_check_distance: 5
split_delta_z: .025
fade_start: 1
fade_end: 10

I am now convinced that there is an algorithm problem in the bed compensation.
I pushed the tests carried out in my previous post on 5 machines, 4 of which I am absolutely sure of the mechanical quality of the machine and the results are 100% similar.

Although at first glance the work done in the algorithm seems of high quality, (a big congratulations and thanks to @Arksine and @koconnor for their work !) forced to recognize that there is a problem.
And the exact repeatability of the problem, whatever the machine, clearly reflects an algorithmic problem. (Even if the compensation algorithm seems quite correct and very well thought out !)

The crushing of the first layer will systematically give, whatever the machine, the following thing :

FirstlayerSquish

The green zone is the one whose crushing is the most coherent according to the z offset, the blue zone is the one where the layer lacks crushing, the red zone is the one where the crushing is too important. (I performed my tests with a number of points ranging from 5 to 15)

I also checked if my “real” z-offset (without mesh) was constant along this digonal (to be able to rule out a twist problem from my axes) and the offset remains constant throughout the area.

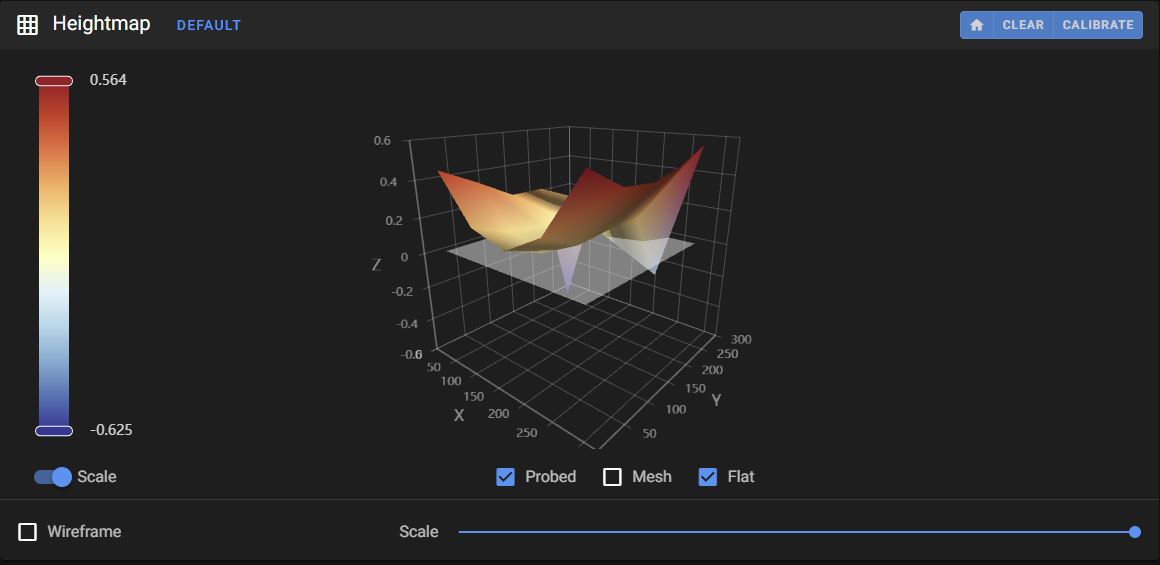
Here is an example of “bed_mesh_output” from one of my machines.
This is my worst machine with a variance of 0.1047mm for a 235mm bed,
my best having a variance of 0.03mm for a 290mm bed.
In printing, however, the results are identical.

13:46:32 
// Mesh Leveling Probed Z positions:
// -0.007917 -0.037813 0.000208 -0.033958 -0.037292
// -0.011979 -0.021979 -0.004583 -0.032500 -0.050729
// -0.012917 -0.020729 -0.002917 -0.019792 -0.044792
// -0.018646 -0.013646 0.009271 -0.011875 -0.033229
// 0.053958 0.031562 0.053854 0.031667 0.010833
13:46:32 
Mesh X,Y: 5,5
Search Height: 10
Mesh Offsets: X=0.0000, Y=0.0000
Mesh Average: -0.01
Mesh Range: min=-0.0507 max=0.0540
Interpolation Algorithm: bicubic
Measured points:
0.053958 0.031562 0.053854 0.031667 0.010833
-0.018646 -0.013646 0.009271 -0.011875 -0.033229
-0.012917 -0.020729 -0.002917 -0.019792 -0.044792
-0.011979 -0.021979 -0.004583 -0.032500 -0.050729
-0.007917 -0.037813 0.000208 -0.033958 -0.037292

As a developer (on .NET applications), I know that it can be frustrating not to have sufficient and objective elements to debug a problem.
And sometimes non-developers wishing to help tend to want to dismiss issues that do not seem related to them.
And for developers sometimes doing this work is tedious!
It takes time (sometimes more in tests than in coding), you have to have a dedicated machine for testing…

However, we all have the power to help developers by clearly and factually explaining our problems to them.
And of course with the greatest courtesy and patience!
We must not lose sight of the fact that they work voluntarily for the community !

For my part, if the development team needs someone to carry out tests without it penalizing them in their other projects,
I can dedicate one of my machines to that. They feel free to contact me if they need it.

Again a big thank to the dev team who provides us with high quality firmware and with incredible flexibility of settings !

I have been asked about this recently so I thought it would be prudent to provide my latest feedback and where I currently stand on it.

While I would never discount that there could be a bug in bed_mesh (I am not infallible), I have been unable to find a situation where it generates the incorrect adjustment in many, many hours of real world and synthetic testing. That isn’t to say that I can’t reproduce issues with a poor first layer, however in my case this has always boiled down to a mechanical or probing issue. For example, on a Voron 2.4 its common for a twisted x-axis to introduce probing error. It is also common for thermal expansion to play a role, there is actually someone working on a module that attempts to compensate for this in software.

@Murdock There does appear to be some kind of reproducible, systemic issue on your printers. In fact, it appears that these issues are very common to Creality printers in general. If you have access to Marlin one thing that would be useful is to compare the probed values (presuming Marlin is configured to probe in the same locations). If they are not similar, then the issue is not likely in bed_mesh. In fact, the OP posted a visualization from Marlin that was quite a bit different from the visualization in Klipper, which suggests an issue with the probing procedure rather than an issue with bed_mesh applying incorrect adjustment.

Ultimately this issue may require Creality themselves to take an interest in Klipper so they can debug it. Otherwise it will require a contributor, who can reproduce this issue, to debug and provide specific guidance on exactly what the bug is.

The graphic that @Murdock provided is exactly the problem I have been chasing for months. I have a heavily modified TronXY X5SA with a 330x330 bed. I’m printing almost exclusively PETG so first layer is critical.

I made a simple change a couple months ago and so far printing has been a dream. I set mesh_pps to 0,0 and now my prints come out great.

[bed_mesh]
speed: 150
horizontal_move_z: 5
mesh_min: 25,25
mesh_max: 305, 305
probe_count: 9,9
algorithm: bicubic
bicubic_tension: 0.2
mesh_pps: 0, 0

I arrived at this after looking at the bed visualizer in Mainsail and noticed how the mesh would sometimes dip below the probed points.

I set these two to the following and my problems went away.

probe_count: 9,9 # Odd number on purpose
mesh_pps: 0, 0 # Turn off mesh interpolation

1 Like

Dear @Arksine,

First of all, many thanks again for your work !

And rest assured that I am not questioning your involvement in solving this problem.
As mentioned above, as a developer I know that sometimes we lack factual and objective feedback.
My remarks are simply intended to bring you back my observations which can be made under a different prism from that under
which some have already been able to come to you. Ah and by the way sorry for my horrible English,
I read it very well but I have trouble expressing myself. (I am French)

As stated in my last post, I extended the test to “non-creality” machines which, by the way,
for the creality machines, for the most part don’t have much from creality anymore… Motherboard SKR passage in MGN12 guidance …

However, I have actually extended this test to a voron 2.4 (without its side walls) which you have actually identified as possibly
also being a source of problems, as well as to a “homemade” machine which is a Cartesian with the bed sliding along the Z axis (a kind of ender 5 in
spirit but more rigid), the latter being entirely in MGN guidance.

So, at least in my case, I think we can strongly rule out that it’s specific to creality machines, but we can’t totally rule out a mechanical problem though.
However, i honestly find it difficult to adhere to this hypothesis (even if it is not impossible) because the fault in the leveling being strictly identical on all the machines,
that would mean that I managed to cause exactly the same mechanical error on machines of different types and designs…

I will take my most reliable and “non-creality” machine and set it up with a marlin to actually be able to identify if the difference is in the measurement
of the height of the bed or in the application of the correction. (I will make sure to perform the measurements at the same coordinates on both firmwares.
I will post the results here, however I cannot guarantee that I will be able to do this before next weekend.
(The week with the work this is always a bit complicated, I think you know that too…)

One last little thing, (yes I know I’m a specialist in 20-page posts lol)
I did a weak test but I said to myself “and why not”.
I modified the organization of the mesh part of my “PRINT_START” as follows:

Heating ...
...
G28;
BED_MESH_CALIBRATE
G28;
BED_MESH_PROFILE LOAD=default
...

To summarize after the calibration I redo a G28 then i load the mesh made just before and without being perfect the defect is strongly attenuated.
I immediately thought of a temperature-related deformation so I redid the test with the printer placed in a box after heating the bed to 60°C for two hours
in both cases and with a 6-hour break between both tests for the machine to be perfectly cooled. And the result is the same with a G28 after the calibration
then a reloading of the calibration, the defect is greatly reduced. (if I had to estimate the gain, I would say between 60 and 70% improvement but that’s subjective)

Congratulations again and thank you for your work.

1 Like

@rwicksall The interpolated mesh does introduce some curvature. For the bicubic algorithm the amount introduced is controlled by the bicubic_tension option, a lower value reduces the amount of interpolated slope. That said, if its working well without interpolated points that is optimal.

@Murdock I agree that issues with mesh leveling are not exclusive to Creality, my anecdotal observation is that they seem more common on Creality printers. As previously mentioned, you appear to have discovered an error that is clearly reproducible on your printers. If we can find the specific source perhaps I can reproduce as well.

I modified the organization of the mesh part of my “PRINT_START” as follows:

This sounds like the relationship between the nozzle and bed changes during the probing procedure. I would be curious if you could achieve the same result without reloading the profile after the G28, as internally there should be no difference. If it does make a difference then we have a hint and I can see if I am able to reproduce a change in internal state when reloading the profile.

1 Like

I agree with you that’s why I launched the probe in all the tests after a 2 hour warm-up with the machine locked in a closed enclosure. But that changes absolutely nothing. It is still possible that the machine still moves after 2 hours but at this point I am surprised.

It’s an easy test, I’m doing this tonight and I’ll give the result as soon as it’s done.

1 Like

FYI, I have made some experimental changes to bed mesh for those interested in testing them.

I don’t anticipate that this is going to fix many of the issues reported here, but its worth a try. If the problems occur during the probing process then I suspect the software solutions would involve things like axis twist compensation and backlash compensation. I won’t rule out that the increased split frequency in the experimental branch may help though, hard to say.

1 Like