I’ve finally got the last round of development ready for everyone to test. It took far longer than I thought it would to complete, but that’s mainly because I stubbornly went down the path of continuously trying to shove a square peg into a round hole. Add to that distractions of everyday life.
No matter what I tried, I could not get classic Ziegler-Nichols parameters to work well for my bed while using the velocity algorithm, regardless of what temperature I calibrated for or what smoothing algorithm I used. The primary reason for this seems to be the huge lag/dead time associated with thick aluminum beds! The fact that my bed sensor is noisy only exacerbated the issue.
@ReXT3D inspired me to try Cohen-Coon parameters, and to my joy, they worked far better regardless of what control algorithm I used. After reviewing my notes and the various papers I’ve collected, I noticed that Cohen-Coon parameters can be calculated using a relay test.
see equations 5 & 6.
Thus I updated the pid calibration class to also calculate Cohen-Coon calibration constants. If you check the klipper log after a calibration run you will see something like this.
Ziegler-Nichols constants: Ku=0.103092 Tu=41.800000
Cohen-Coon constants: Km=-17.734845 Theta=6.600000 Tau=-10.182680
Autotune: final: Kp=15.773129 Ki=0.754695 Kd=82.414600
PID parameters: pid_Kp=15.773 pid_Ki=0.755 pid_Kd=82.415
The SAVE_CONFIG command will update the printer config file
with these parameters and restart the printer.
save_config: set [extruder] control = pid
save_config: set [extruder] pid_Kp = 15.773
save_config: set [extruder] pid_Ki = 0.755
save_config: set [extruder] pid_Kd = 82.415
You can take the constants from the log and drop them into the attached spreadsheet (can be opened with almost any spreadsheet application, including several free ones), and try out the various pid parameters.
pid_params.zip (5.3 KB)
As a refresher you can run pid calibration with the following command.
PID_CALIBRATE HEATER=heater_bed TARGET=70 TOLERANCE=0.03 WRITE_FILE=1
- WRITE_FILE is not needed unless you want to look at the output directly.
- TOLERANCE defaults to 0.02 if not passed in. The tighter the tolerance the better, but how tight you can achieve depends on how clean your sensor readings are.
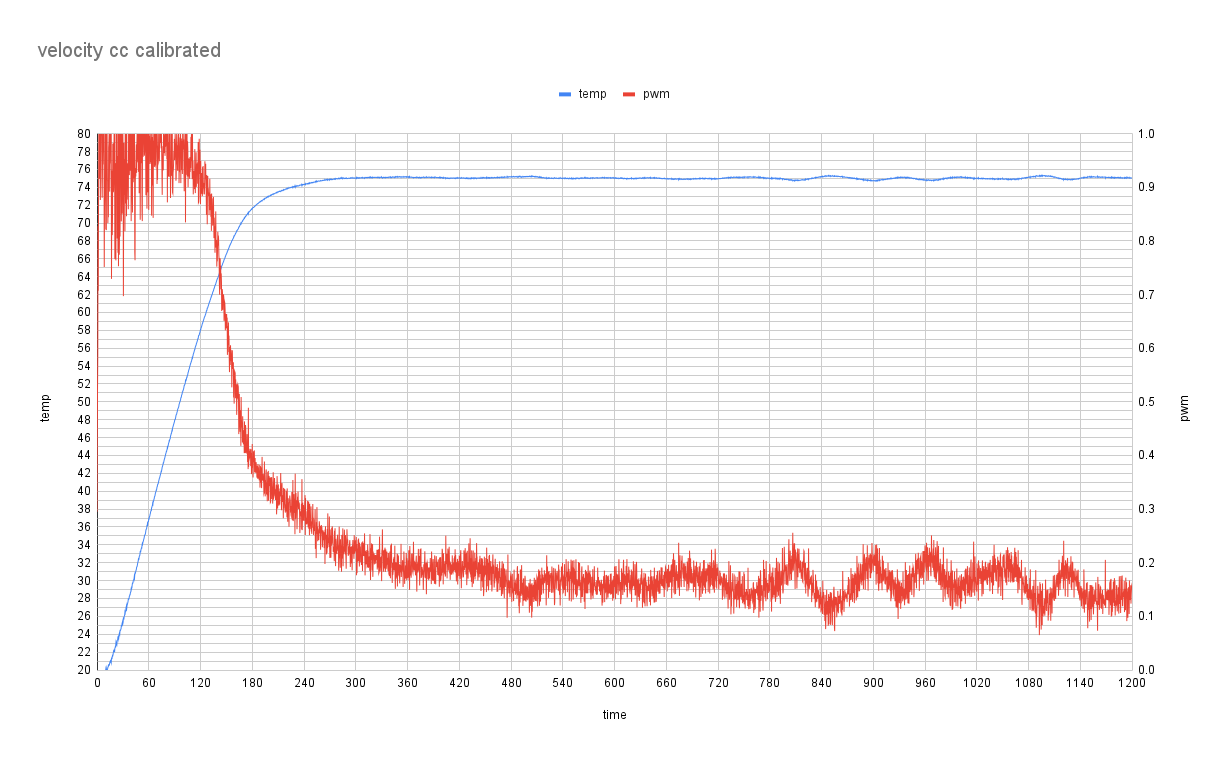
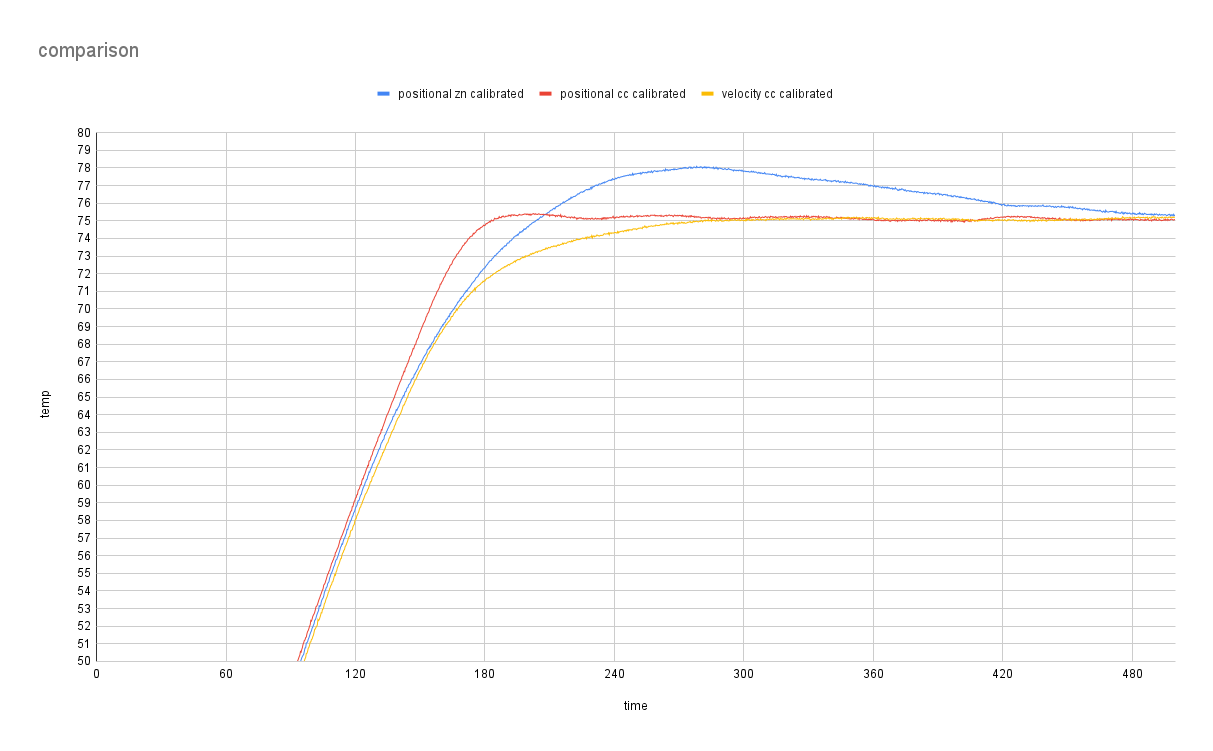
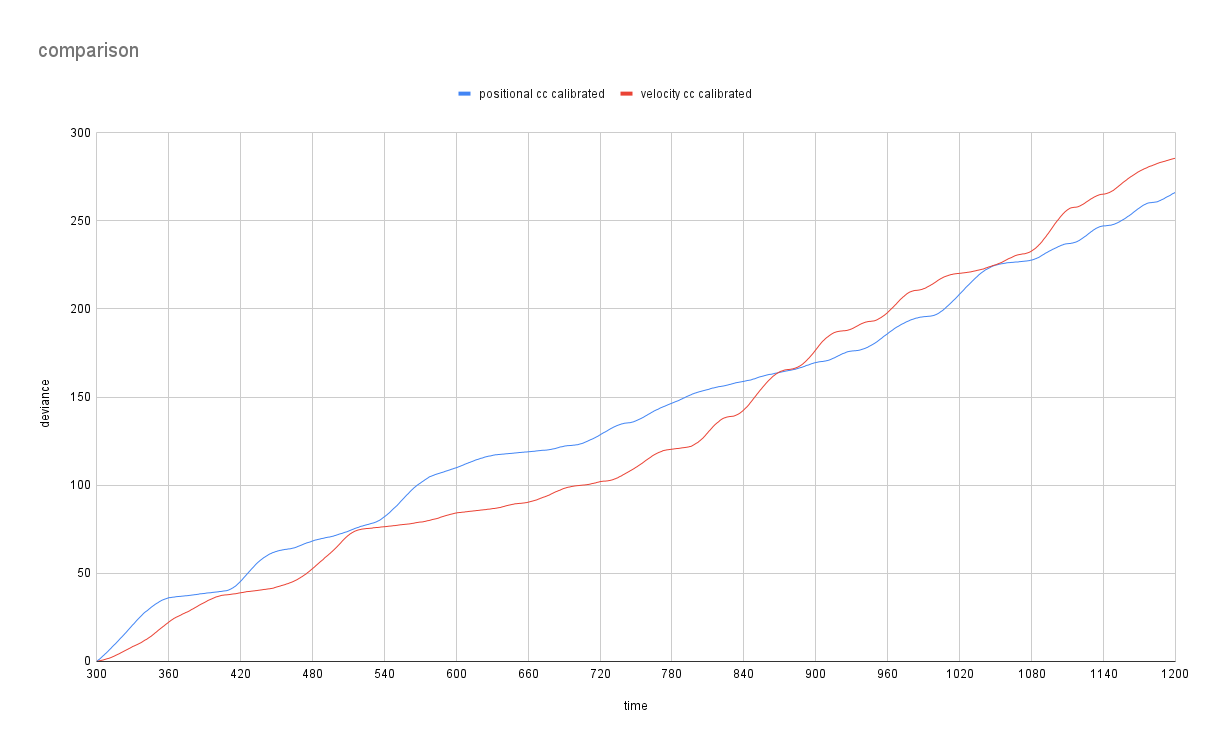
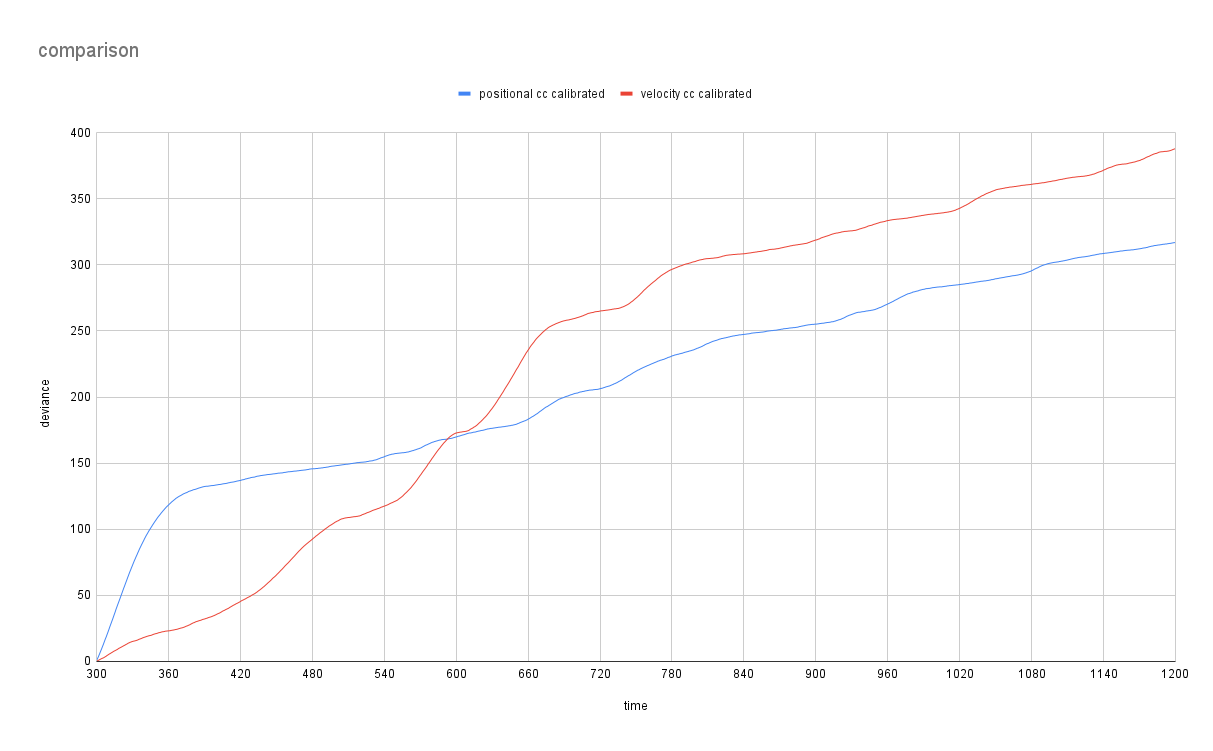
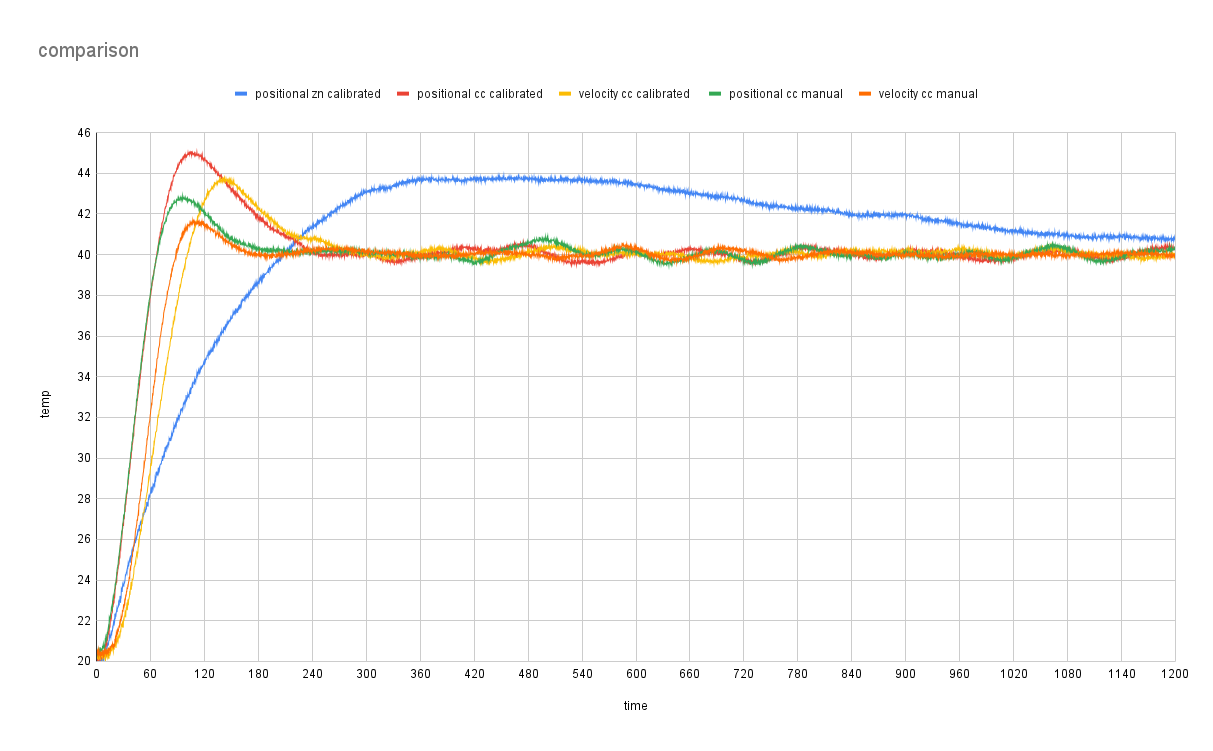
The following graphs show comparisons between Ziegler-Nichols classic & Cohen-Coon parameters generated from the same calibration run.
The plot shorthand is as follows:
positional - the current control algorithm used by klipper
velocity - the new velocity control algorithm
zn - Ziegler-Nichols
cc - Cohen-Coon
calibraded - pid parameters generated directly from a calibration run.
manual - pid parameters generated from a calibration run that have been manually tweaked to yield better performance.
75C bed
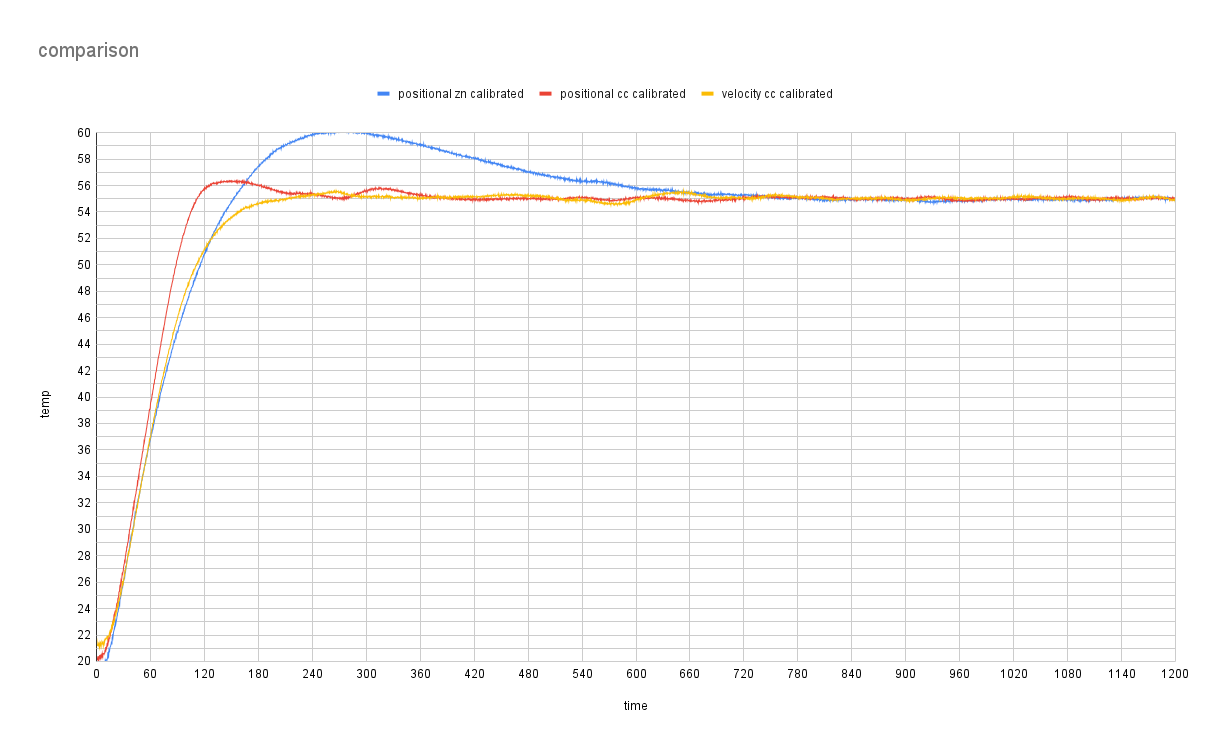
55C bed
40C bed
40C is by far the hardest scenario to control on my printer. it’s within 20C of ambient and only requires 4 to 6% of the heaters capacity to maintain temperature.
If you want to try the velocity algorithm, just change the Control algorithm from “pid” to “pid_v” in your config. Be sure to monitor the first run, because if you have bad pid parameters, or a particularly noisy system the velocity algorithm might not work for you without manual tuning.
the code can be found here.
https://github.com/dans98/klipper/tree/PID-Improvements