MANTA M5P Flashing and Running Custom Firmware

Ok I get that but in my case, I have actually not used an SD card at any stage of the set up for there to be such a mismatch. I wrote the OS image to the eMMC and then also installed Klipper, Fluiddpi and moonraker onto the cm5 eMMC I believe because I just installed them straight from KIAUH when running the SSH session on the CM5.

I could still give just using an SD card a go anyways as I dont really have any other alternatives right now but it seems to be a USB hardware or timing issue rather than a storage one.

The MCU in the Manta M5P is recognized when you execute lsusb. LIBUSB_ERROR_TIMEOUT is typically a USB cable issue - but in the Manta M5P you have a hardwired USB connection between the CM5 and the M5P’s MCU.

Based on this data, along with the number of changes you’ve made to the rPi OS and Klipper configurations and software, I would like to go back to the original software without any changes to either it or the system and see how that works.

Great then I will start from scratch and give it a go.

Hey @mykepredko, so I’ve ran into an issue when trying to SSH into my CM5. I ensured to configure the wireless connectivity the exact same way as last time when I got it connected.
I cannot find its IP address on my router so I have a feeling I haven’t flashed the OS image from the SD card correctly.

What I did so far was the following:

  1. Ease the memory of the eMMC on the Pi
  2. Write the RPI 64 Bit lite OS to my 32 GB SD Card
  3. Flash the OS by first disconnecting the board from power, turning DIP switches 3 and 4 OFF, inserting the SD card into the slot all the way and then turning the power back on the board. Am I supposed to see LED ACT flicker after 5 minutes or so? The LED remained static.

I wonder why the connectivity is not working despite having set up the wireless connection on RPI Imager just like before when it worked.

The LED should flash for a few minutes during booting.

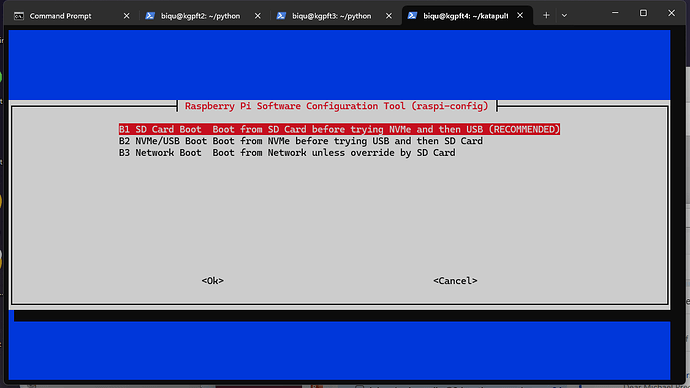
The most likely cause of what you’re seeing now is that the boot order in the CM5 is still the eMMC.

When you’re doing this, I suggest you connect an HDMI monitor to the Manta M5P so you can see how the CM5 boot is progressing.

Why didn’t you go into raspi-config and set the boot order to SD Card first?

To go there, select “6 Advanced Options” and then “A4 Boot Order”.

This way, you wouldn’t have had to change anything in your eMMC and if it worked, we could go back to what you’ve done to the eMMC image and figure out what went wrong.

I don’t know if it can still be done but with a little playing around (with the help of the monitor), you should be able to figure out why you’re not booting.

Ohh had I known I would have definitely just kept the OS written on the Pi and did what you recommended. Too late now unless I go back and flash the Pi and retrace my steps.

I’ll connect a screen first and see how it tracks when I flash with the SD card to ensure it’s progressing properly. Would’ve thought the network connection would be the least of my problems never know with this stuff hahaha. Thanks for the suggestion.

Hey @mykepredko, I was wondering if I could also get a display if I were to plug a USB2.0 into the MANTA USB2.0 ports to HDMI into a monitor? Just trying to work with what I got for now if possible. The HDMI ports I see on the MANTA M5P are the small HDMI0 & HDMI1 Ports.

Short answer is no.

You could set something up when you have an OS running and you add the drivers but that’s exactly what I don’t want you to do. It also won’t display any power up information.

I want you to run a pristine OS Image off the SD Card and display how it powers up on a basic HDMI display so that we can see if there are any hardware issues identified during boot and then see how Flashing the Manta M5P’s MCU works.

Sorry, you need to buy a Micro-HDMI to HDMI cable or converter.

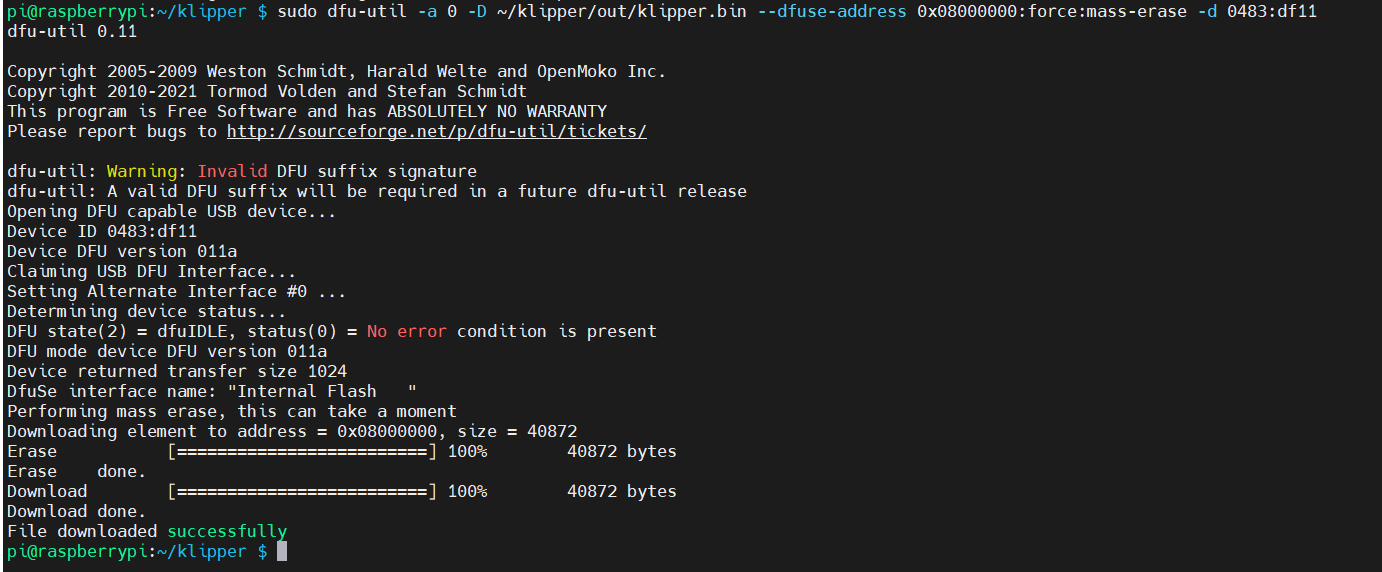
No worries then. Turns out I was able to boot and flash the firmware all fine now after writing to the eMMC again! However, this time I didn’t play around with any of the raspi configs like I did before and I also accepted a prompt to join to the “dialout” and “tty” groups which appears to be necessary for Klipper to access serial ports, which are used to communicate with the 3D printer’s microcontroller. I honestly do not recall this prompt coming up in my previous attempt so maybe when I tampered with the raspi-configs it messed up the usb-serial communication.

Really nice to see and will continue now working towards achieving some basic stepper control and eventually running my own application via moonraker.

Evidence of successful firmware flash:

1 Like

I was also wondering @mykepredko, is it possible to run moonraker API and Klipper without internet connection? I was researching and saw some people have suggested running moonraker and Klipper on the Pi’s local host to access the web server of Moonraker. Is this possible from your experience and what are some steps I can follow to get this set up? What exactly is the local host in this context?

The idea is the desktop application I have successfully interfaced with Klipper via Moonraker would be able to run and execute the G-code commands even if the device is offline.

It is my understanding that Klipper and Moonraker do not have any kind of network connection - the internet connection comes from Mainsail/Fluidd or Octoprint.

I suggest that you start with:

I’m not an expert in the internals of the Klipper ecosystem but as I understand it, Moonraker does not have a “web server” - see the Knowledge Base article referenced above.

@nefelim4ag, can you comment here?

Go up to the second post in this thread - I put in some example code that allows you to send commands (ie G-Code) to Moonraker/Klipper directly.

1 Like

Well, I think there is basically no difference between LAN and the Internet.
The basic difference is that one is Local and the other is a global network.

Klipper could listen local socket. Klipper provides JSON RPC, which is not HTTP.
So strictly speaking, it is not a web server (a web server generally should serve HTTP content: World Wide Web - Wikipedia).

Moonraker, on the other hand, is the Web Server. It serves HTTP on some TCP port.
Probably there is also an Nginx (Proxy and Web Server) that is proxying the Moonraker and serves the WebUI/Client files to the browser (client - you). So, the browser could execute them, show you UI of your choice, which underneath would send requests to the moonraker.

Generally speaking, you can run any of those things locally (within your network).
Well, this is why you install everything on the SBC.

So, you locally (in your network) access the Nginx on the SBC.
It serves you the WebClient.
WebClient, through the nginx, accesses the Moonraker, which accesses the Klipper.
(This is what Kiauh does by default).

Could you run the stack without internet access? Definitely.
Could you run it with internet access? Definitely.
Could it access the internet? If your LAN has internet, it probably could do that.
Could you access this from the internet? If you publish it to the internet, you probably can.

Could you run it on “localhost”? You can.
Localhost means 127.0.0.1, literally localhost.
My host has 127.0.0.1, your host have it, any device with network stack would have it.
It meant to work with things locally.
Think about it as a sort of “self”.
Can I access myself? Probably yes.
Can somebody access my “self”? Probably no.

Hope that explains something.
2 Likes

For me, the user’s request is far too unspecific to provide any meaningful input. This means the goal or requirement to be achieved is fully unclear. In addition, the basics of networking and how such services interface should be halfway understood. Here the link @mykepredko posted is at least a starting point.

FWIW, basic networking access, at least in a LAN context, should be given, or the options to efficiently work with the whole setup are limited, e.g., uploading new G-code files to be printed.

1 Like

Thanks for this really detailed and clear explanation!

I hope I have understood it right but here is what I have understood. Imagine Klipper as the printer operator, Moonraker is the receptionist who takes orders and tells the operator what to do and then my GUI that is also running as a desktop application on the same SBC is calling the receptionist to send the instructions. If all these 3 are in the same local network (like wifi/ethernet), it is as if they are all in the same building with an internal phone system. For no network just localhost communication, they would all be in the same room and so would not need any phones at all but rather they just talk directly.

This is what I reckon I can accomplish if I program my GUI to send JSON commands to Moonraker’s API by sending directly to Moonraker’s default port. I will give this a go and see how it works.

Hi @mykepredko, I was wondering what you thought about an issue I am facing when attempting to deploy sensorless homing on the Z axis using my MANTA M5P Board.

So the M5P shares one driver amongst two z motors M3A and M3B. I have configured only one stepper_z object and doubled the run current as I have seen recommended online but I keep getting choppy movement of both steppers.

It appears to be stalling very easily even though I have tested increasing the stallguard threshold and have set it to the same threshold that works just fine when testing the same motor on x and y. I have also ensured to check the wires are seated in firmly.

Everytime the movement halts, the error message “Endstop stepper_z still triggered after retract for url: http//127.0.0.1:7125/printer/gcode/script?script=G28+Z” comes up.

Would it have anything got to do with using 2 steppers on the same driver? Perhaps it messes with the stall guard functionality or sensitivity and is there a known solution to compensate for this? It is very baffling because dual motor control for the height of the bed in 3D printing is so commonplace and the motors are working just fine when homing on the other axes.

I would think it has everything to do with using 2 steppers on the same driver.

I’ve never tried that before, having two motors in parallel and use sensorless homing (“StallGuard” in Trinamic parlance) on one, but I would expect that you would see much less current on having two motors wired in parallel and that it’s very difficult (if not impossible) to get sensorless homing working.

In any case, you can’t rely on sensorless homing being accurate for two motors in parallel because your system can’t detect slippage between the two of them and you need to set up your two sides very precisely to ensure they’re completely in phase.

When you say you’ve “doubled the run current”, what value are you running now?

1 Like

Adding to @mykepredko: This functionality is far from the needed precision for a z-axis. Also, z-axes often exert high forces over very short distances (depending on gearing and drive system).

Looking at the Manta’s schematic, it even seems that they wired the connectors in parallel. This is very unlikely to ever work with stallguard and is, well, pretty dumb. See 7. Wiring Stepper Motors in Series or Parallel

2 Likes

Sensorless homing an axis with 2 motors on one driver is almost guaranteed to end up with your 2 motors ending up a random number of steps out of “alignment”. You would need extremely rigid stops on each motor and set your sense current MUCH higher than the single motor stall current. Once stalled the first motor still consumes current. You have to supply enough additional current to continue to drive the 2nd motor.

Then “hope” the second motor gets to the stop before the driver generates an over temp error and shuts down.

This very much depends on how the motors are wired. As indicated in the link above, wiring in parallel does not have a current impact but is the worst thing you can do, otherwise.

It never occurred to me to wire the motors in series due to every 4 driver/5 plug board I’ve looked at (as well as conversion harnesses in dual Z upgrade kits) have the motors wired in parallel…

I should have read the EXCELENT knowledge base article before chiming in.

------------- off topic ----------

I just noticed the M5P is a 5 driver/6 plug board… Weird. Is that just so the user can save a couple bucks on a driver for a dual Z setup or is there a common 6 motor printer configuration I can’t think of?