cardoc
December 23, 2025, 5:17pm
21
You would likely need to make some changes to the wire harness. If you plan those to be reversable then yes reversion would be easy as swapping the boards back.
The source code for Marlin firmware is on Github
Reverting the firmware would likely be easier than the wiring changes.
The deciding factor is weather you are willing to go through the process to convert the pin names. Also see klipper/config/sample-aliases.cfg at master · Klipper3d/klipper · GitHub
hcet14
December 23, 2025, 9:26pm
22
Do I get you right? You want to start a try with a new printer board and your RPi3?
Could you provide some pics of your current printer board with the wiring?
hcet14
December 24, 2025, 10:10pm
27
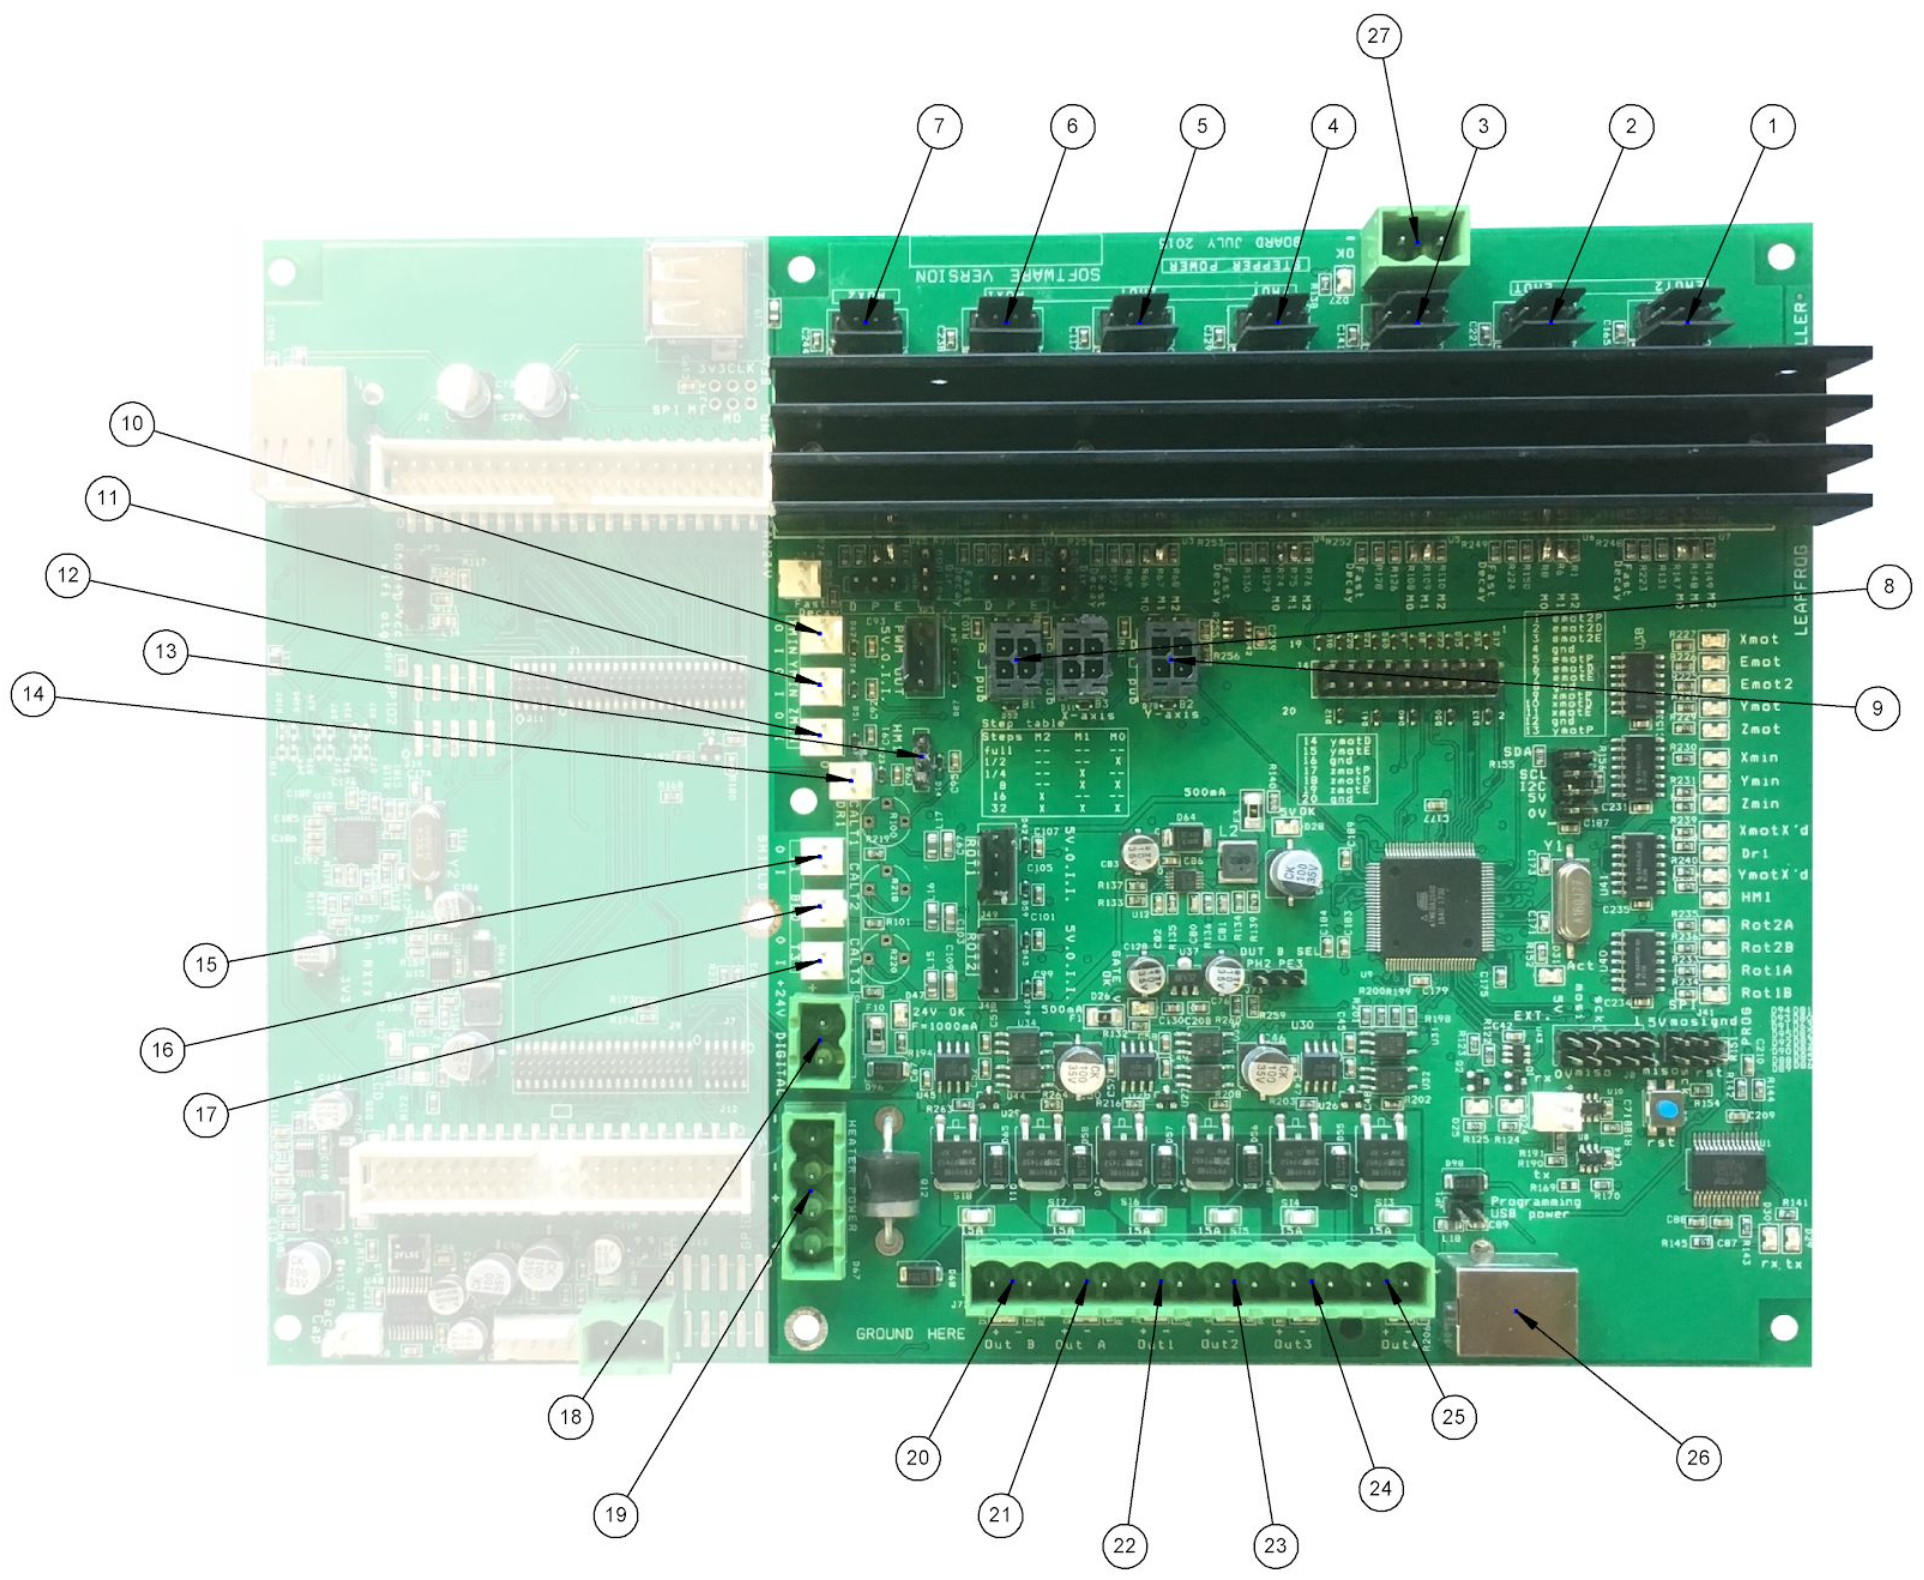
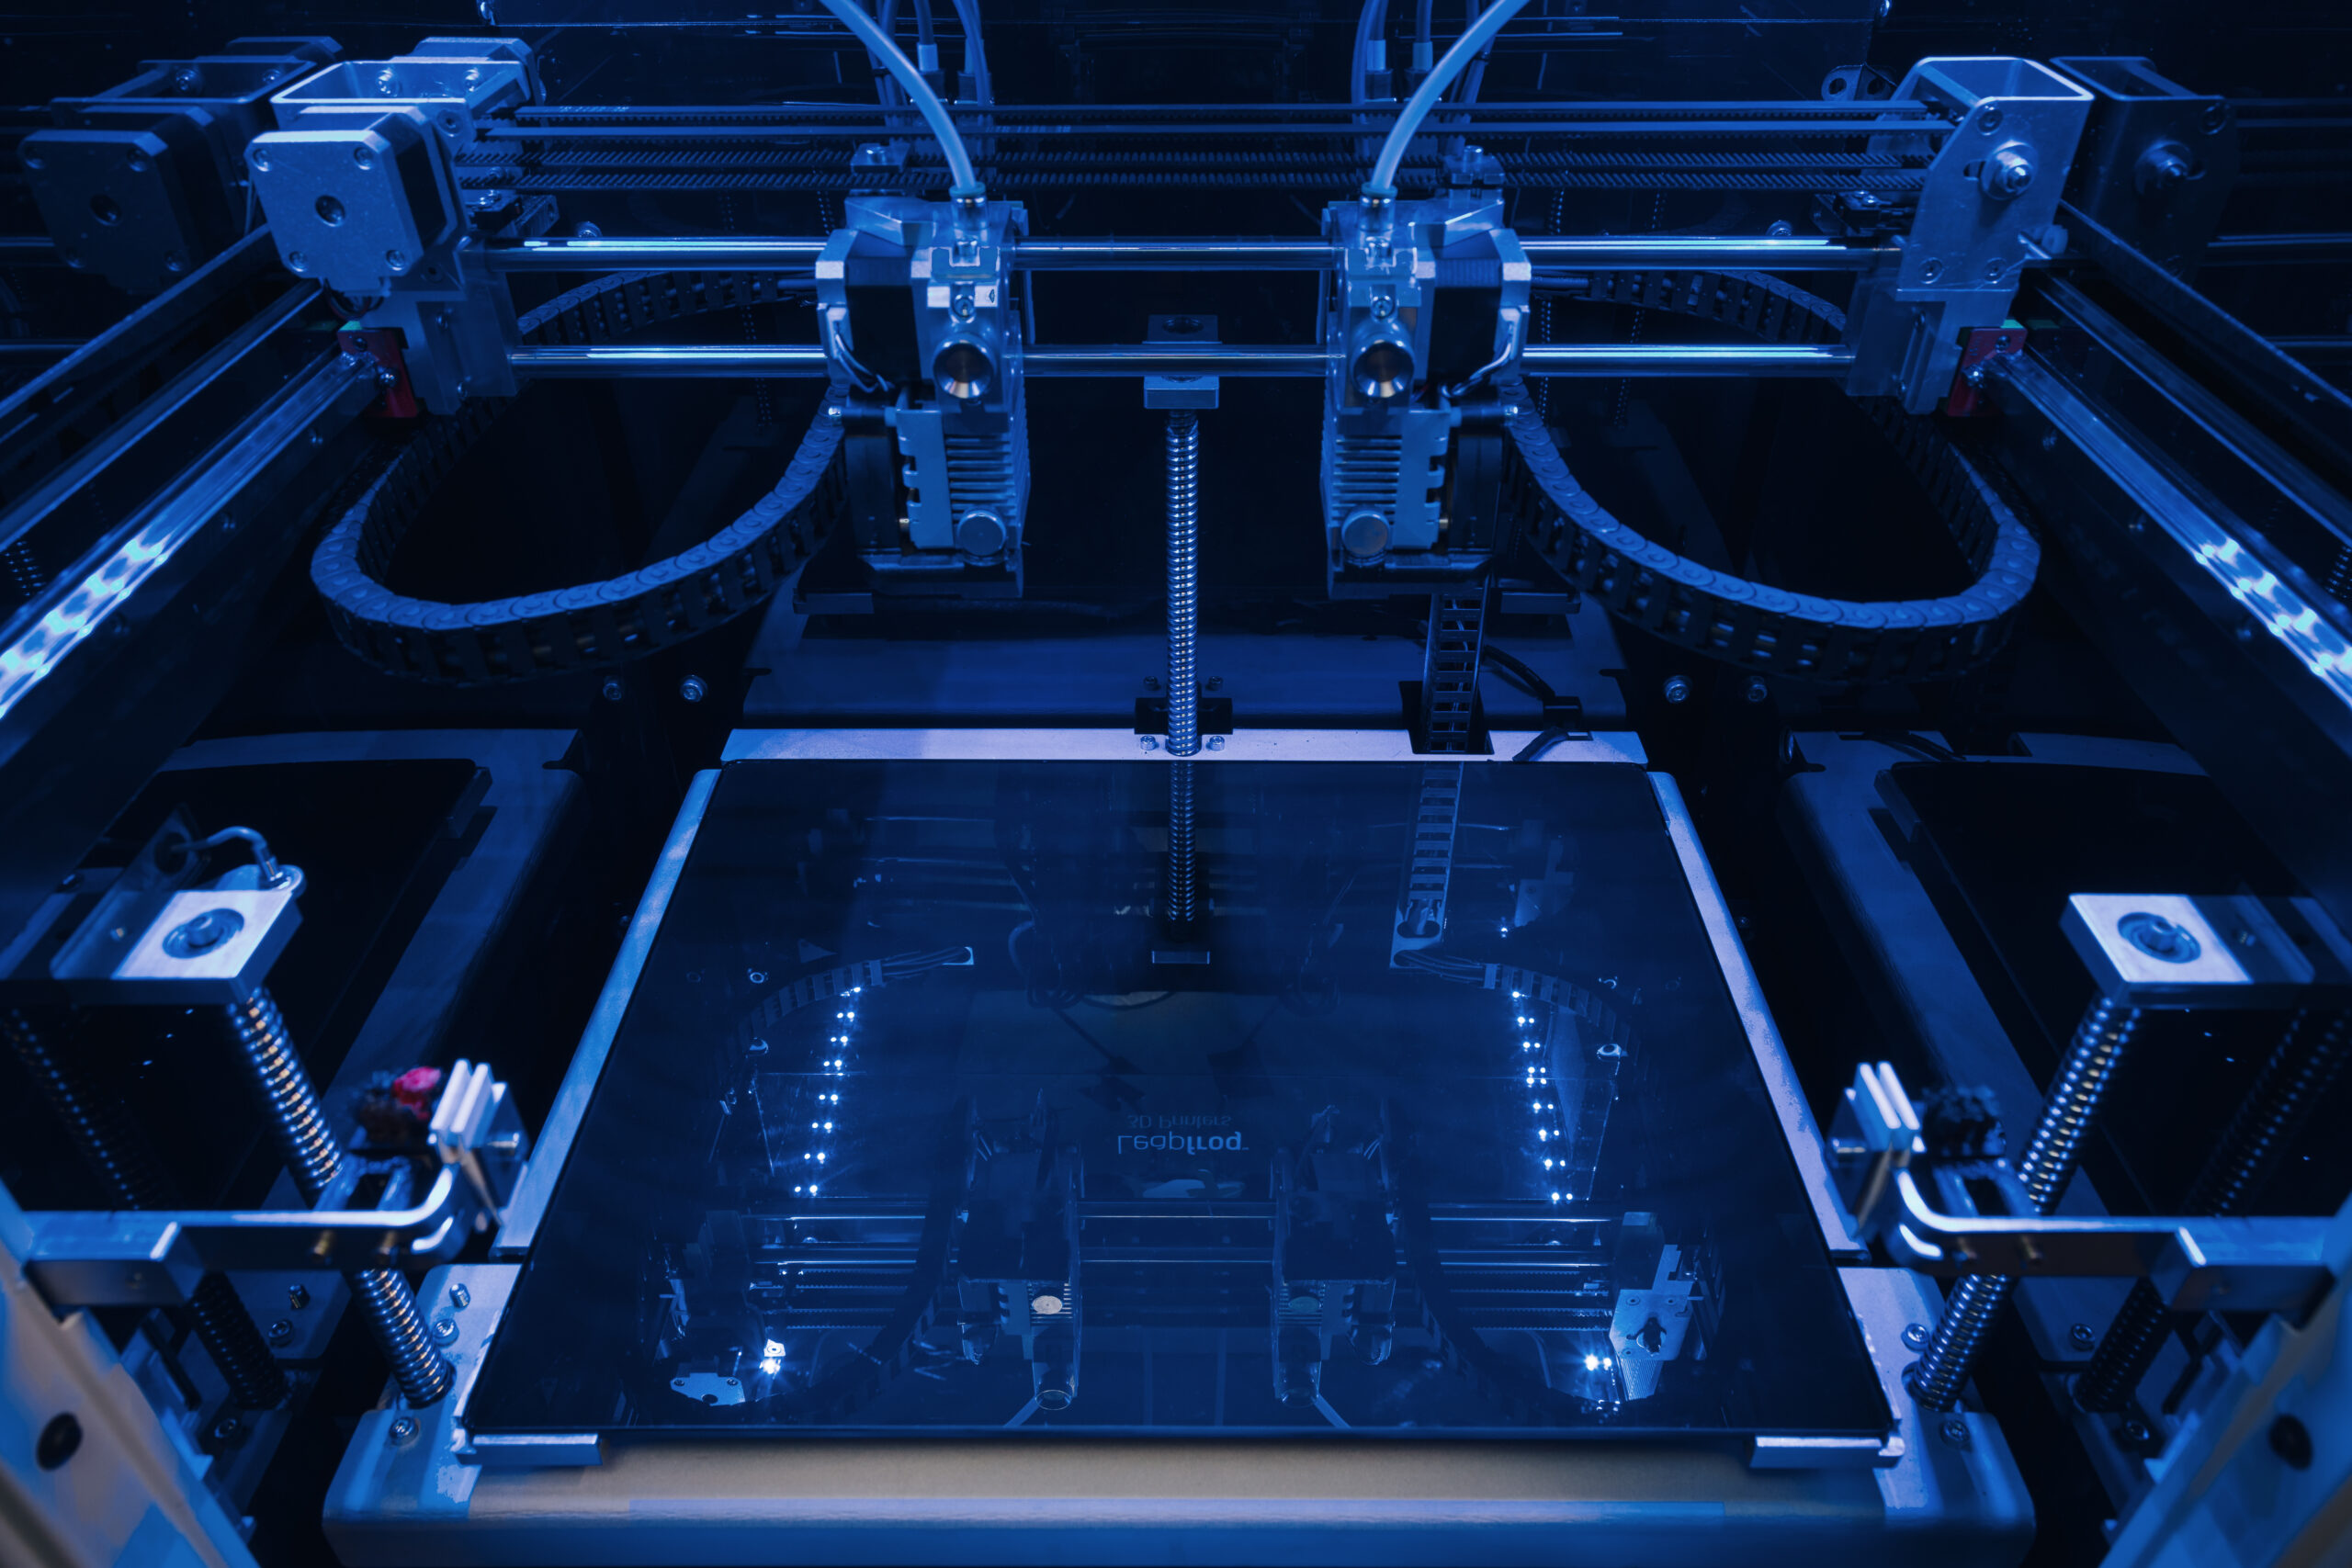
The connections to the stepper drivers are not clear in your first picture. I guess all 7 drivers are used. See also https://repair.wiki/images/2/20/CBVrgkrU8XbqYyuzJ1CJzY2f9PjW8YqChQ.png .
I count 7 steppers here
https://3druck.com/wp-content/uploads/2017/06/Leapfrog-3D-printers-Bolt-PRO-print-bed-scaled.jpg .
Is that right? Is the x-axis of both extruders the same or is every x-axis independent?
cardoc
December 25, 2025, 1:11am
28
It occurred to me that converting marlin to klipper is a task for AI…
Leapfrog.bolt.pro.printer.cfg (8.2 KB)Leapfrog.bolt.pro.DualX.printer.cfg (5.4 KB)
Miller
December 25, 2025, 7:25pm
29
Wauw would this be really working for the leapfrog bolt series?
I will check the steppermotors locations tomorrow
1 Like
cardoc
December 25, 2025, 10:33pm
30
So I went back and argued with Copilot and got it to properly convert the thermistor pins and the rotation distances for X and Y. I don’t know the belt ratio or screw pitch for Z so you may have to update once you get the motors to move.
#####################################################################
#  MCU
#####################################################################
[mcu]
# Marlin: BAUDRATE 250000
# Klipper only needs the correct serial device.
serial: /dev/serial/by-id/usb-serial-device   # <-- CHANGE THIS

[printer]
kinematics: cartesian
max_velocity: 400          # Marlin DEFAULT_MAX_FEEDRATE X/Y
max_accel: 400             # Marlin DEFAULT_ACCELERATION
max_z_velocity: 20         # Marlin DEFAULT_MAX_FEEDRATE Z
max_z_accel: 100           # Marlin DEFAULT_MAX_ACCELERATION Z
square_corner_velocity: 5  # Derived from Marlin XY jerk (20 mm/s)

#####################################################################
#  X0 (Right extruder carriage)
#####################################################################
[stepper_x]
# Pins from pins.h:
#   X0_STEP_PIN 28
#   X0_DIR_PIN 63
#   X0_ENABLE_PIN 29
step_pin: PF4
dir_pin: PK1
enable_pin: PF5

microsteps: 16
rotation_distance: 40.0    # GT2 belt, 20T pulley (2mm * 20)

# Endstop from pins.h:
#   X0_MAX_PIN 45
endstop_pin: ^PL4
position_endstop: 339       # Marlin X_MAX_POS
position_max: 339
position_min: -37           # Marlin X_MIN_POS
homing_speed: 100           # Marlin HOMING_FEEDRATE X = 100*60 mm/min

#####################################################################
#  X1 (Left extruder carriage)
#####################################################################
[stepper_x1]
# Pins from pins.h:
#   X1_STEP_PIN 14
#   X1_DIR_PIN 15
#   X1_ENABLE_PIN 39
step_pin: PJ1
dir_pin: PJ0
enable_pin: PG2

microsteps: 16
rotation_distance: 40.0     # Same mechanics as X0

# Endstop from pins.h:
#   X1_MIN_PIN 47
endstop_pin: ^PL2
position_endstop: -37       # Marlin X_MIN_POS
position_min: -37
position_max: 339
homing_speed: 100

#####################################################################
#  Y Axis
#####################################################################
[stepper_y]
# Pins from pins.h:
#   Y_STEP_PIN 65
#   Y_DIR_PIN 64
#   Y_ENABLE_PIN 66
step_pin: PK3
dir_pin: PK2
enable_pin: PK4

microsteps: 16
rotation_distance: 32.0     # GT2 belt, 16T pulley (2mm * 16)

# Endstop from pins.h:
#   Y_MAX_PIN 48
endstop_pin: ^PL1
position_endstop: 322        # Marlin Y_MAX_POS
position_max: 322
position_min: -33            # Marlin Y_MIN_POS
homing_speed: 100

#####################################################################
#  Z Axis
#####################################################################
[stepper_z]
# Pins from pins.h:
#   Z_STEP_PIN 31
#   Z_DIR_PIN 32
#   Z_ENABLE_PIN 30
step_pin: PC6
dir_pin: PC7
enable_pin: PC5

microsteps: 16
rotation_distance: 1.0       # Marlin Z steps/mm = 1920 → 1mm per rev leadscrew

# Endstop from pins.h:
#   Z_MIN_PIN 49
endstop_pin: ^PL0
position_endstop: 0          # Marlin Z_HOME_POS
position_min: 0
position_max: 205            # Marlin Z_MAX_POS
homing_speed: 6              # Marlin HOMING_FEEDRATE Z = 600 mm/min

#####################################################################
#  Extruder 0
#####################################################################
[extruder]
# Pins from pins.h:
#   E0_STEP_PIN 34
#   E0_DIR_PIN 35
#   E0_ENABLE_PIN 33
step_pin: PC3
dir_pin: PC2
enable_pin: PC4

microsteps: 16
rotation_distance: 7.5       # Based on Marlin E steps/mm (198.6)

# Heater from pins.h:
#   HEATER_0_PIN 9
heater_pin: PH6

# Thermistor from Configuration.h:
#   TEMP_SENSOR_0 = 1 (EPCOS 100k)
sensor_type: EPCOS 100K B57560G104F
sensor_pin: PK5              # TEMP_0_PIN = 13

min_temp: 5                  # Marlin HEATER_0_MINTEMP
max_temp: 275                # Marlin HEATER_LOW_TEMP_MAX
max_extrude_only_distance: 200   # Marlin EXTRUDE_MAXLENGTH

#####################################################################
#  Extruder 1
#####################################################################
[extruder1]
# Pins from pins.h:
#   E1_STEP_PIN 37
#   E1_DIR_PIN 40
#   E1_ENABLE_PIN 36
step_pin: PC0
dir_pin: PG1
enable_pin: PC1

microsteps: 16
rotation_distance: 7.5

# Heater from pins.h:
#   HEATER_1_PIN 8
heater_pin: PH5

# Thermistor from Configuration.h:
#   TEMP_SENSOR_1 = 1
sensor_type: EPCOS 100K B57560G104F
sensor_pin: PK7              # TEMP_1_PIN = 15

min_temp: 5
max_temp: 275

#####################################################################
#  Heated Bed
#####################################################################
[heater_bed]
# Pins from pins.h:
#   HEATER_BED_PIN 10
heater_pin: PB4

# Thermistor from Configuration.h:
#   TEMP_SENSOR_BED = 1
sensor_type: EPCOS 100K B57560G104F
sensor_pin: PK6              # TEMP_BED_PIN = 14

min_temp: 5
max_temp: 100                # Marlin BED_MAXTEMP

#####################################################################
#  Fans
#####################################################################
[fan]
# Pins from pins.h:
#   FAN_PIN 5
pin: PE3

#####################################################################
#  Toolhead Parking (IDEX)
#####################################################################
[gcode_macro T0]
# Marlin: EXTRUDER_OFFSET_X {0, -EXTR2_X_OFFSET}
# Activates right carriage
gcode:
    SET_DUAL_CARRIAGE CARRIAGE=0

[gcode_macro T1]
# Activates left carriage
gcode:
    SET_DUAL_CARRIAGE CARRIAGE=1

[dual_carriage]
axis: x
safe_distance: 2.0           # Marlin DEFAULT_PARK_OFFSET
Miller
December 27, 2025, 4:11pm
33
Raspberry and klipper is done (only the screen is turned 90degrees, next up is motherboard🤞
1 Like
Miller
December 27, 2025, 6:24pm
35
Thanks. Its working now. Tomorrow will start with the connection to the motherboard
hcet14
December 27, 2025, 8:56pm
36
Miller:
Which hardware will you use?
Miller
December 27, 2025, 9:37pm
37
I will first use all the original hardware, see how that works and go from there if anything needs to change. Most probably also some fans to change for noctua
1 Like
cardoc
December 27, 2025, 9:55pm
38
# Install & Use KIAUH to Build Klipper for the Bolt Pro (ATmega2560)

KIAUH handles the environment setup, Klipper install, Moonraker, Mainsail/Fluidd, and firmware building.
Your Bolt Pro board is an **ATmega2560**, so the build target is the same as an Arduino Mega.

---

## 1. Install KIAUH
If you haven’t already:

```bash
cd ~
git clone https://github.com/th33xitus/kiauh.git
cd kiauh
./kiauh.sh
Inside the menu:
Install Klipper
Install Moonraker
Install Mainsail or Fluidd (your choice)
KIAUH handles all dependencies automatically.
From the KIAUH main menu:
[4] Advanced
   → [1] Build Firmware
This launches Klipper’s menuconfig.
Inside menuconfig, choose:
Microcontroller Architecture: Atmega AVRProcessor Model: ATmega2560Clock Reference: 16 MHzCommunication Interface: Serial (UART0)Baud Rate: 250000
These match your Marlin config exactly.
Save and exit.
After exiting menuconfig, KIAUH automatically runs:
make clean
make
When it finishes, it tells you where the firmware file is located:
~/klipper/out/klipper.elf.hex
That’s the file you’ll flash to the Bolt Pro board.
Your board behaves like an Arduino Mega, so flashing is done with avrdude.
Find the serial device:
ls /dev/serial/by-id/
Then flash:
avrdude -v -p atmega2560 -c wiring \
  -P /dev/serial/by-id/usb-<your-board> \
  -b 115200 -D \
  -U flash:w:~/klipper/out/klipper.elf.hex:i
Notes:
Flashing always uses 115200 baud , even though Klipper later uses 250000 .
If flashing fails, press the board’s reset button and retry within 5 seconds.
In your printer.cfg:
[mcu]
serial: /dev/serial/by-id/usb-<your-board>
restart_method: arduino
baud: 250000
Restart Klipper and you’re connected.
Miller
December 28, 2025, 4:03pm
39
So its now working, klipper is on correct and firmware is on the motherboard.
Now the screen is giving me messages.
Any help would be appreciated
1 Like


