The following is basic documentation on how to setup SuperSlicer/Prusa Slicer/Slic3r to automatically change filaments though extruder stepper changes during a print.
I am not expert with Klipper, SuperSlicer, Prusa Slicer, and/or Slic3r. I will note any challenges that I’ve experienced during my setup and testing. I will also address any input provided in order to enhance this document for others to benefit from.
This builds upon the Config: X-In/1-Out Non-Mixing Extruder Config
Doc. Started: 08-dec-2022
Initial Completion: 09-dec-2022
Updated: 14-apr-2023 - added PrusaSlicer 2.6.0-alpha6 WIP
Updated: 22-feb-2024 - Klipper version + SuperSlicer updates and added purging lessons learned.
Updated: 24-feb-2024 - Added Wipe Tower and Lessons Learned sections.
Updated: 25-feb-2024 - Added BUGS section.
Klipper Version(s) this is working with:
v0.11.0-5
v0.11.0-6
v0.11.0-14
v0.11.0-30
v0.11.0-41
v0.11.0-173
v0.12.0-114
SuperSlicer Version(s):
v2.4.58.5
v2.5.59.8 pre-release
PrusaSlicer Version(s):
v2.6.0-alpha6 [WIP - has only been visually compared to SS and not tested on a printer]
v2.7.1
Assumptions:
Printer is operational using the above noted Config and using Klipper’s [extruder_stepper] to provide additional stepper inputs to your hot-end.
Definitions:
- Extruder - The complete system of a combination of a Hot End, one or more Extruder Stepper(s), and connection system (typically PTFE tubing) that drives and directs filament though the printer
- Hot End - the device that melts the filament to be delivered to the print surface.
- Extruder Stepper - The drive system that pushes the filament into the Hot End, typically comprised of an stepper motor, drive gears, and some type of containment system (typically PTFE tubing).
Hardware and Dimensions:
My printer is a Piper2 Core-XY using a Phaetus Dragon SF hot end and a 4-in/1-out SCP Splitter. Adjusting dimensions provided will be necessary and may reduce some issues related to my specific setup.
I’m currently using a dual-drive BMG extruder and a self designed 4:1 compact belt driven extruder. however the extruders as well as their location are not necessary for this document.

This is the gantry image of a Piper2 Core-XY. there are three areas to be aware of:
- Cool Zone - The area in the hot end that filament travels and should be ‘cool’.
- Cooling Tube Position - a dimension from tip of the hot end to about the middle of the Cool Zone. This position, in the Cool Zone, is used by the slicer to cool and shape the filament before removing during a filament swap.
a) 45mm for E3D v6 (approx)
b) 32mm for Dragon SF (approx)
c) 36mm for Dragon HF (approx)
d) 25mm for Mosquito (approx) - Filament Park Position - a dimension from the tip of the hot end to where another filament can easily enter the filament path to hot end from another entry point. This will vary greatly from printer to printer. The slicer uses this dimension to remove one filament and load another. The shorter this distance, the less issues will be seen during printing.
a) 140mm for my Piper2 Core-XY - Due to the length of this dimension, a Klipper error is induced and will be noted/address later in the document.
Klipper Configuration - printer.cfg options used:
The following additions are used during the filament change / Tool Change routine. Further explanation will be provided in the SuperSlicer Setup section.
(Update 22-feb-2024 - Not using the PARK, FILAMENT_LOAD2, and CONTINUE macros during tool changes, however they can still be useful. Through additional testing and use, I’ve modified slicer settings to use built-in unload/load features.)
[gcode_macro PARK]
description: Park the head to change tool
gcode:
    M117 Parking Head...
    ##### set defaults #####
    {% set x = params.X|default(-15) %}      #edit to your park position
    {% set y = params.Y|default(0) %}      #edit to your park position
    {% set z = params.Z|default(10)|float %} #edit to your park position
    {% set e = params.E|default(4) %}        #edit to your retract length
    ##### save current x and y position ####
    SAVE_GCODE_STATE NAME=park_state
    ##### calculate save lift position #####
    {% set max_z = printer.toolhead.axis_maximum.z|float %}
    {% set act_z = printer.toolhead.position.z|float %}
    {% set lift_z = z|abs %}
    {% if act_z < (max_z - lift_z) %}
        {% set z_safe = lift_z %}
    {% else %}
        {% set z_safe = max_z - act_z %}
    {% endif %}
    ##### end of definitions #####
    G91
    {% if printer.extruder.can_extrude|lower == 'true' %}
      G1 E-{e} F2100
    {% else %}
      {action_respond_info("Extruder not hot enough")}
    {% endif %}
    {% if "xyz" in printer.toolhead.homed_axes %}
      G1 Z{z_safe}
      G90
      G1 X{x} Y{y} F6000
    {% else %}
      {action_respond_info("Printer not homed")}
    {% endif %}
    M117 Head Parked...
PARK is used to move the print head off the purge block to a safe area for unloading and loading. This was done to remove heat from the printed objects.
[gcode_macro CONTINUE]
description: Continue's printing after tool change
gcode:
    M117 Print Continuing...
    ##### set defaults #####
    {% set speed = params.SPEED|default(180) %} #edit to your travel speed in mm^2
    ##### end of definitions #####
    RESTORE_GCODE_STATE NAME=park_state MOVE=1 MOVE_SPEED={speed}
    M117
CONTINUE (updated) - used to move the print head back to the purge block after loading filament. Will be adding the MOVE_SPEED option in the near future.
[gcode_macro FILAMENT_LOAD2]
description: Loads filament from splitter to hot end
gcode =
	M117 LOADING...
	G91
	G1 E110.0 F900
	G4 P900
	G1 E30.0 F150
	G90
    M117
FILAMENT_LOAD2 will extend the filament 140mm, from the Filament Park Position back to the Tip of the Hot End. This will be explained further and may not be needed if you have a shorter Filament Park Position dimension.
NOTE: I have a FILAMENT_LOAD1 gcode_macro that load filament from the stepper extruder gears to the Filament Park Position. It is not needed for the purpose of this document.
SuperSlicer Setup:
Printer Settings → General

- Set the number of Extruder Steppers configured in Klipper. This should be the total number of steppers in [extruder] and [extruder_stepper] objects. My printer has one extruder and one extruder_stepper = 2 extruders in SuperSlicer
- Check the Single Extruder Multi Material check box. This should enable additional features
- Confirm that the new menu object Single extruder MM setup is visible along with the number of extruder(s). If the new menu is not available, un-check the Single Extruder Multi Material, increase Extruders, an then re-check Single Extruder Multi Material. Once the new menu is visible, adjust Extruders to the correct number of your printer.
Printer Settings → Custom G-code

Add in the appropriate Tool change G-code. Mine is as follows:
;Tool Change g-code.
;PARK, FILAMENT_LOAD2, and CONTINUE macro's replaced with Slicer settings
;PARK
ACTIVATE_EXTRUDER EXTRUDER=[tool_name]
;FILAMENT_LOAD2
;CONTINUE
During a filament swap, I decided to add some extra G-code that provides the following functions:
- ACTIVATE_EXTRUDER EXTRUDER=[tool_name] - This does the physical switch between extruder_steppers in FW.
Printer Settings → Single extruder MM setup

Insert the value you determined from the first image above for Cooling tube position and Filament parking position. These values will be explained later on and how they work along with the Extra loading distance value.
Printer Settings → Single extruder MM setup → Advanced wipe tower purge volume calculs
This section is interesting. I’ve activated it and SuperSlicer will automatically generate the purge block based off settings here and per-filament Pigment Percentage value (0-1). Test print was made using a semi-translucent yellow and blue filament, which is a excessive change needing a large purge block.
Nozzle volume: V = π * r2 * h or V = 3.14 * (1.75mm/2)sqd * 25mm. 25mm is approximate measurement from tip to start of heat sink. Default = 120
Multiplier: I set to 120, which is what the Nozzle Volume was. Default = 60
Algorithm: I changed to Hyperbola since it seemed to provide a larger purge block, which was needed due to the selected filaments (translucent yellow and blue).
Printer Settings → Extruder (x)
These settings were explained in detail under my previous Confg post, link above.
Filament Settings
Reminder: Filament Settings are unique per filament selected. Make sure that you make changes to this section that is appropriate for each specific filament to be used.
Filament Settings → Multimaterial

This section is fairly long. Review and adjust as needed settings in the temperature, string reduction, and wipe tower settings.
Toolchange parameters…
(Change 22-feb-2024 - Major updates in this section)
These settings have been changes due to having more time and experience with muti-extruders.
Loading speed at the start and Loading speed default values seem to be reversed, in my opinion. I increased the Loading speed at the start to be greater as this is an “extruder only” move. Loading speed is a combination of tool head move over the purge block and long E-move (at least in my setup). I was comfortable with the Unloading speeds being set to both 80mm/s
Number of cooling moves is updated to the default of 4. This helps shape the tip of the filament during the unload.
Pigment Percentage should be adjusted from 0 to 1 based on the filament pigment. 0 = natural/clear. 1 = black. This should be taken into consideration for how much purging is necessary to clean out the nozzle during the wipe tower moves. example: Light to Dark = less purging, Dark to Light = more purging needed. This SuperSlicer value used with the Advanced wipe tower calculs.
Filament Settings → Custom G-code

Nothing out of the ordinary here. Great place to set PA values (based on filament selected and may be different for each extruder. I had to move the Z_ADJUST logic to the Printer Settings → Custom G-code → Start G-code so that the Z_ADJUST is not changed every time a tool is changed.
Print Settings
Reminder: Print Settings are unique per configuration selected. Make sure that you make changes to this section that is appropriate for each specific Printer Settings to be used.
Print Settings → Multiple extruders

Extruders, Ooze prevention, and Advanced sections will not be addressed in this document. Adjust as you see fit.
Wipe Tower needs to be Enabled and uncheck the Prime all printing extruders for starters. Feel free to adjust the default location of the Wipe tower position. It can be dynamically moved around on the 3D View before slicing. The remaining settings can be adjusted if/as needed.
PrusaSlicer Setup:
(22-feb-2024 - This section needs to be updated still.)
Note: PrusaSlicer configurations are based on the 2.6.0 release due to Klipper support and added macro functionallity
Printer Settings → General

- Set the G-Code Flavor to Klipper.
- Set the number of Extruder Steppers configured in Klipper. This should be the total number of steppers in [extruder] and [extruder_stepper] objects. My printer has one extruder and one extruder_stepper = 2 extruders in SuperSlicer
- Check the Single Extruder Multi Material check box. This should enable additional features
- Confirm that the new menu object Single extruder MM setup is visible along with the number of extruder(s). If the new menu is not available, un-check the Single Extruder Multi Material, increase Extruders, an then re-check Single Extruder Multi Material. Once the new menu is visible, adjust Extruders to the correct number of your printer.
Printer Settings → Custom G-code*

In order to maintain similar G-code settings between SuperSlicer and PrusaSlicer, I used some new PrusaSlicer v2.6.0 custom variable functionality.
Start G-Code - This creates a custom variable called tool_name that will call set the Klipper configured stepper name based on Tx tool numbering that PrusaSlicer uses.
;Tool: [current_extruder]
{if current_extruder == 0 then
  global tool_name="extruder"
elsif current_extruder == 1 then
  global tool_name="belted_extruder"
else
  global tool_name="unknown"
endif}

{
"ACTIVATE_EXTRUDER EXTRUDER=" + tool_name + "
";
"SET_PRESSURE_ADVANCE ADVANCE=0 EXTRUDER="+ tool_name + "
";
}
.
*End G-code -
{
"SET_PRESSURE_ADVANCE ADVANCE=0 EXTRUDER="+ tool_name + "
";
}

{if total_toolchanges==0}
  ; Unloads filament to Filament Park Position - 140mm from tip.
  ; Only needed for non-multi-material prints.
  FILAMENT_UNLOAD
{endif}
.
Tool change G-code -
;Tool Change G-code
{if layer_num > 1 then
  "PARK
  ";

  if next_extruder == 0 then
    global tool_name="extruder"
  elsif next_extruder == 1 then
    global tool_name="belted_extruder"
  else
    global tool_name="unknown"
  endif

  "ACTIVATE_EXTRUDER EXTRUDER=" + tool_name + "
  ";

  "FILAMENT_LOAD2
  ";
  "CONTINUE
  ";
else

endif}
During a filament swap, I decided to add some extra G-code that provides the following functions:
- PARK - Moves head off the printing area. This also removes hot end heat from the wipe tower during the loading process
- ACTIVATE_EXTRUDER EXTRUDER=[tool_name] - This does the physical switch between extruder_steppers in FW.
- FILAMENT_LOAD2 - loads the filament the needed 140mm from Filament Park Position to Tip. This may not be needed for shorter Filament Park Position dimensions.
- CONTINUE - Moves the print head back to the wipe tower so purging can take place.
General → Single extruder MM setup

Insert the value you determined from the first image above for Cooling tube position and Filament parking position. These values will be explained later on and how they work along with the Extra loading distance value.
General → Extruder (x)
These settings were explained in detail under my previous Confg post, link above.
Filament Settings → Advanced

This section is fairly long. Review and adjust as needed settings in the temperature, string reduction, and wipe tower settings.
Toolchange parameters…
These settings will be explained a bit more when we look at the generated g-code later in this document.
Adjust the Load and Unload speeds if you’d like. The image is more conservative than the defaults.
Change Number of cooling moves to 4 (updated from original SuperSlicer settings).
Filament Settings → Custom G-code

Nothing out of the ordinary here. Great place to set PA values (based on filament selected and may be different for each extruder. I had to move the Z_ADJUST logic to the Printer Settings → Custom G-code → Start G-code so that the Z_ADJUST is not changed every time a tool is changed.
Start G-code -
; Filament specific Start G-code
;
;Tool: [current_extruder]
{if current_extruder == 0 then
  global tool_name="extruder"
elsif current_extruder == 1 then
  global tool_name="belted_extruder"
else
  global tool_name="unknown"
endif}
;
;
{ if tool_name == "extruder" then
  "; PLA PA
  ";
  "SET_PRESSURE_ADVANCE ADVANCE=0.653 SMOOTH_TIME=0.040 EXTRUDER=" + tool_name + "
  ";
elsif tool_name == "belted_extruder" then
  "SET_PRESSURE_ADVANCE ADVANCE=0.4176 SMOOTH_TIME=0.040 EXTRUDER=" + tool_name + "
  ";
else
endif }
;
Print Settings
Reminder: Print Settings are unique per configuration selected. Make sure that you make changes to this section that is appropriate for each specific Printer Settings to be used.
Print Settings → Multiple extruders

Extruders, Ooze prevention, and Advanced sections will not be addressed in this document. Adjust as you see fit.
Wipe Tower needs to be Enabled and uncheck the Prime all printing extruders for starters. Feel free to adjust the default location of the Wipe tower position. PrusaSlicer allows for dynamically moving the prime tower around on the 3D View before slicing. The remaining settings can be adjusted if/as needed.
Toolchange Workflow:
The following steps are a basic toolchange workflow in SuperSlicer.
- Ramming procedure - This is little positive extrustion moves and the print head moves back and fourth over the purge block to try to shape the end of the filament
- Retract to Cooling Tube Position - Four retraction sequence used to move and form the tip of the filament into the Cool Zone. Speed is controlled under Filament Settings and Unloading speed at the start value.
- Cooling Move - Configured by (Filament Settings) Number of Cooling Moves, Speed of Cooling Moves, and (Printer Settings) Cooling Tube Length. This too is done as the print head moves back and fourth over the purge block.
- Retract to Filament Park Position (140mm from Tip). Speed is controlled under Filament Settings and Unloading Speed value.
- Filament End G-code, if configured
- Tool Change G-code
- Filament Start G-code, if configured
- Tool Change Filament Load sequence - This is 3-step filament load process where the filament move the complete distance of the Filament Park Position dimension (140mm-ish) by 20%, then 70% and finally 10% of the total distance
Distance = Filament Park Position + Extra Loading Distance configured in Printer Settings.
Speed = Speed is controlled under Filament Settings and Loading speed at the start and Loading speed values. - Purge (print) new filament on the wipe tower
- Continue printing part with new filament.
Example Sliced Model with Tool Change at Layer:
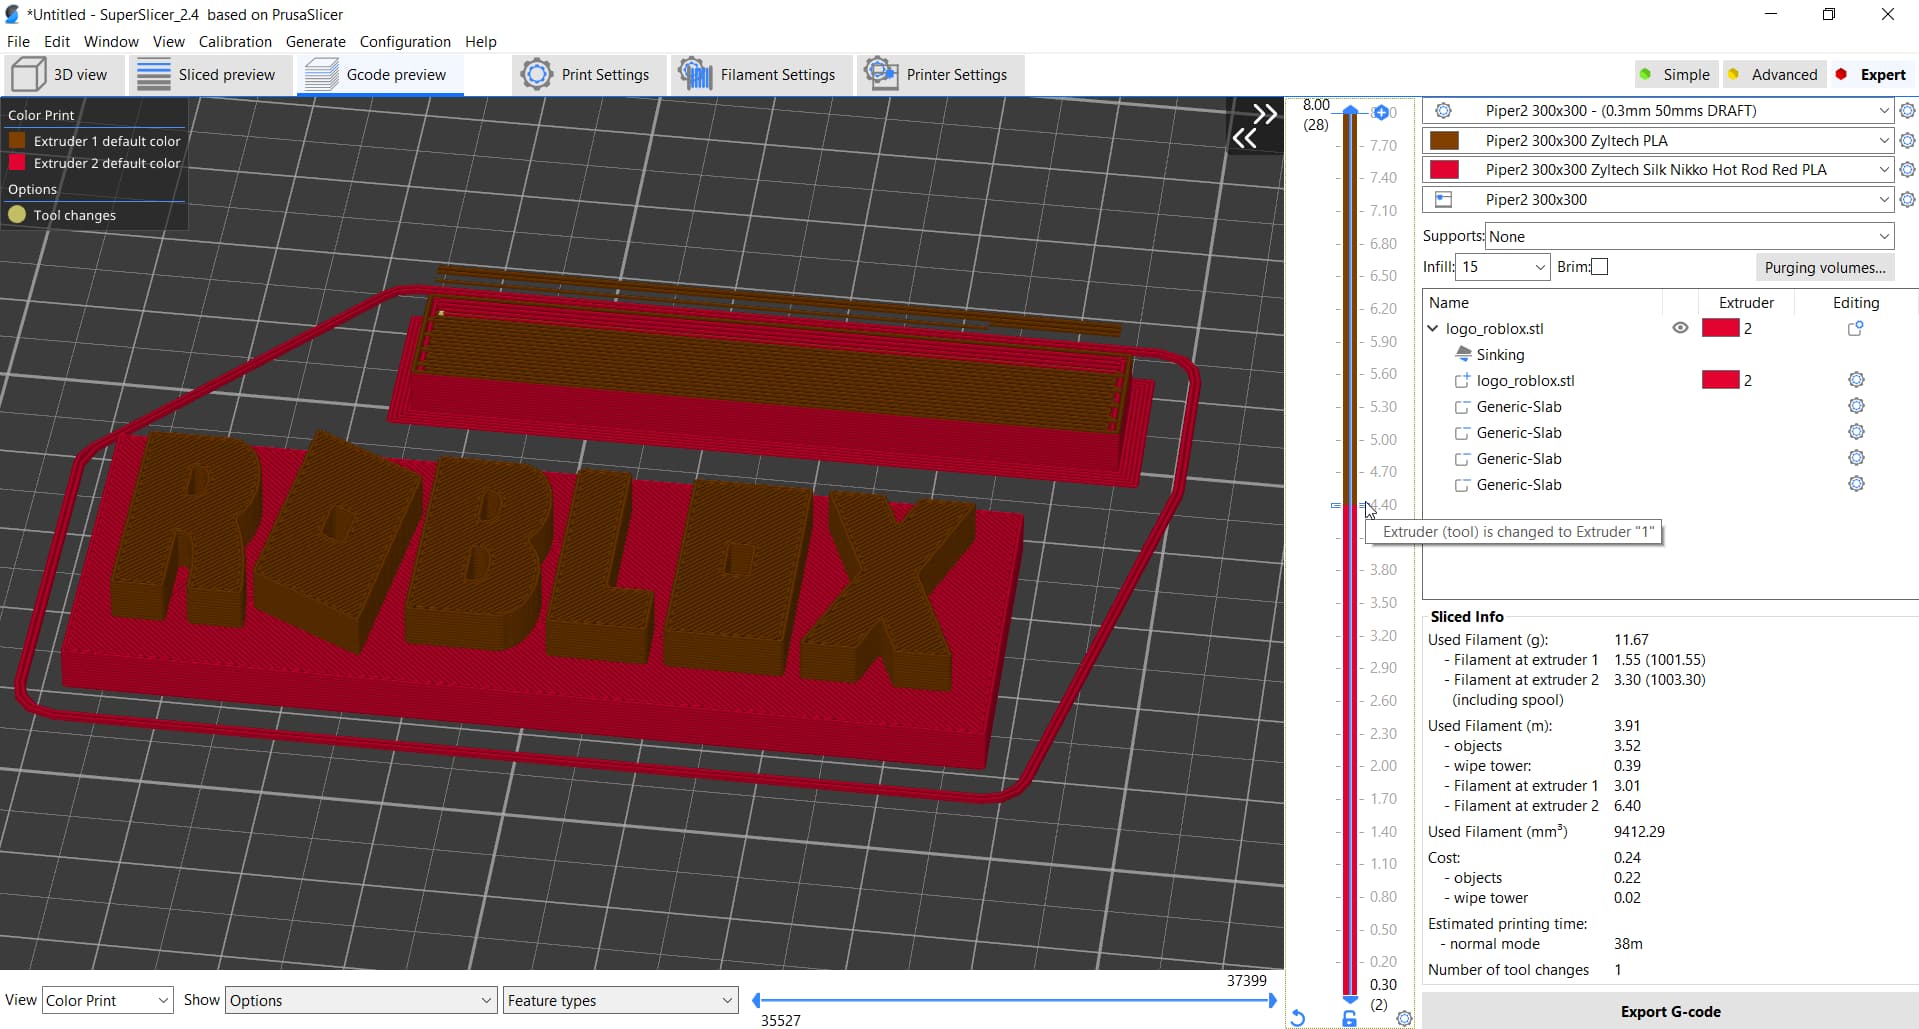
This image is of the sliced model. a simple logo with a color change at a layer. Purge/Wipe block is just to the top.
Generated G-code and explanation of settings:


Challenges & Issues:
(Updated 22-feb-2024).
Due to the long length of 140mm, this process, Klipper may throw a Move exceeds maximum extrusion (##.###mm^2 vs 0.640mm^2) error, or similar.
The G-code causing the issue is under the Tool Change Filament Load section:

Specifically the two X-moves in combination with the long E-moves.
To compensate, adjust the printer.cfg [extruder] section for max_extrude_cross_section to a value slightly larger than the error noted.

Printed Results:

To-Do Item(s):
I still need to adjust the Custom G-code in several areas by using {if wipe_tower == 1} logic to enable/disable mutli-color/single color print specific g-code.
UPDATE:
I was unable to use the wipe_tower variable to key off of for g-code needed for non-toolchaning printing. I found a total_toolchanges variable was available and used that in my End G-code section in SuperSlicer to retract the filament at the end of a print:
{if total_toolchanges == 0}
; Unloads filament to Filament Park Position - 140mm from tip.
; Only needed for non-multi-material prints.
FILAMENT_UNLOAD
{endif}
Toolchanging printing routines have a built in final retract to Filament Park Position, so adding a similar final retract for non-toolchanging printing keeps the workflow consistent.
Filament Unload g-code_macro -
This was created to mimic the same process used during toolchanging printing. The retract to Cooling Tube Position, Cooling moves, and retract to Filament Park Position routine does not form a tail on the end of the filament.
[gcode_macro FILAMENT_UNLOAD]
description: Unloads filament from hot end to Filament Park Position
gcode =
	G91
#   Retract to Cooling Tube Position
    G1 E-15 F4800
    G1 E-13.65
    G1 E-3.9 F2400
    G1 E-1.95 F1440  ;-34.5mm retraction
#   Cooling Move
    G1  E5 F1531
    G1  E-5 F2366
#   Retract to Filament Park Position
    G1 E-105.5 F2000  ;-140mm retraction total
	G90
Wipe Tower / Purge Blocks:
This is going to be very subjective and will be different based on what colors/filament types you are using. ie: light to light, light to dark, dark to light, or dark to dark. Also consider weather or not the filament is translucent or solid. IMHO, stay away from mixing solids colors with translucent colors as my experience is that it is very difficult to not get some color bleeding from an already printed solid color filament an a translucent filament.
SuperSlicer -
SuperSlicer has two methods for setting up Wipe Towers/Purge Blocks:
- PrusaSlicer method, denoted below
- Advanced Wipe Towwer, discussed here.
If you are using option #2, then under Filament Settings → Multimaterial, enter a Pigment percentage value between 0 and 1. 0 for translucent/natural, 0.2-0.5 for white and 1 for black.

Next, under Printer Settings → Single extruder MM setup. Adjust the Nozzle volume according the the melted section of your hot end. Adjust the Multiplier and Algorithm according the size of purge Wipe Tower you think you need.

Slice your model and see how wide SuperSlicer determines the Wipe Tower to be.
If you don’t care to use the calculus method, you can turn off this feature and utilize the below method.
PrusaSlicer and SuperSlicer -
Select Purging volumes button.

Make adjustments as necessary and press OK when done.

Default values are 70 all around.
Based on experience, do not reduce the loaded value below 70, otherwise enough of a priming cycle may not occur to get good flow of filament.
I don’t care for the “unloaded” and “loaded” terms used in this panel, so let’s change unloaded to PURGE and loaded to PRIME.
Using the example image above and for a 2 color Yellow/Blue print let’s think about what is happing in this way:
- Blue is loaded and I need to purge 12.5mm on a 60mm Wipe Tower to flush out the blue filament in order to get a nearly clean yellow, so I enter 125 in the blue unloaded box.
- Yellow is now loaded and I want to prime an additional 12.5mm on a 60mm Wipe Tower. Enter 125 in the yellow loaded box.
- Yellow is loaded and I want to purge 2mm on a 60mm Wipe Tower, enter 20 in the yellow unloaded box
- Blue is now loaded and I want to prime 7mm on a 60mm Wipe Tower, enter 70 in the blue loaded box.
The final depth of my Wipe tower should be the set 60mm wide, and 25mm deep (12.5mm on the blue purge and 12.5mm on the yellow prime).
Purge Test -
Concept here is to create a Wipe Tower to see how many mm of purging needed to change between two colors.
- Turn off the Wipe Tower in Print Settings → Multiple extruders.
- Change the Infill TOP pattern to Rectangular and the Angel to 90 degrees in Print Settings → Infill. The last later should be a back and fourth in the X pattern.
- Create a box that is 60mm x 60mm x 2 layer think (0.4mm). Set the primary filament as the dark colored filament.
- Slice
- At top layer, insert an extruder change the the light colored filament.
This should give you 2 layers of dark and the last layer is your light color. - Slice again and export
- Measure the distance it took to purge the dark color out until the light color was cleanly printing. In my Blue to Yellow example, it took 15mm - 20mm to purge the blue. Now determine how much more you want to prime the new color, I’m going to use 10mm 15mm and make my Wipe Tower 30mm deep. These two measurements can be used to set how deep the Wipe Tower is after slicing is done. SuperSlicer Advance Wipe Tower or PrusaSlicer Purge Volumes.

Testing from Dark to Light will give you a good idea on the worse case for purging. Light to Dark you can make a good guess, or perform the same test in reverse.
Additional Wipe Tower resource: Wipe tower | Prusa Knowledge Base
Lessons Learned:
Purging Speeds - Watch that your purge lines are nice extrusions. I found 100mm/s is a top speed to get good purging/priming of filament. Anything faster and the purge lines would skip/break/tear and purging between colors was not complete.
Z-Lift - Did not help with preventing blending of colors, but did help to create more strings.
Avoid Crossing Parameters - Disable this feature. Although this reduces stringing, the filament is not retracted between travels moves as the hot end moves though walls and infill. A slight string of color may be left in the path causing mixing of filament colors.


Insufficient purging - increase Wipe Tower values

Retract / Wipe Options -
Since I have a really long Bowden setup, I found that using the following two options for each extruder under Printer Settings → Extruder # → Retraction were helpful in reducing stringing and color blending/bleeding:
- Wipe while retracting
- Retract amount before wipe set to 70%

SuperSlicer has some additional options to control when to wipe. I ticked the At end option only.

BUGS -
SuperSlicer v2.5.59.x though .8 has a bug that inserts an extra G1 Z move before any custom start G-Code when the Wipe Tower is activated.

To compensate, add a G-Code Substitution to comment out the G-Code.

However, this also removed a needed G1 Z move that is right after the Custom Start G-Code. Insert, at the bottom of the Start G-Code section something similar to:
; Drop down to first_layer_height due to removing extra Wipe Tower Z-Move
; by using G-code substituation which remove two G1 Z0.2 F720 moves
; one inserted by the Wipe Tower, and one that is needed.
G1 Z[first_layer_height] F600
Adjust the feed rate value to be slightly different than what you are commenting out via the G-code Substitution.
.
PrusaSlicer v2.7.1 seems to insert SET_PRESSURE_ADVANCE ADVANCE=0 commands before each purge on the Wipe Tower. The command does not include the needed EXTRUDER=< extruder stepper > value, so we will need to use G-code Substitution to comment out these commands.

